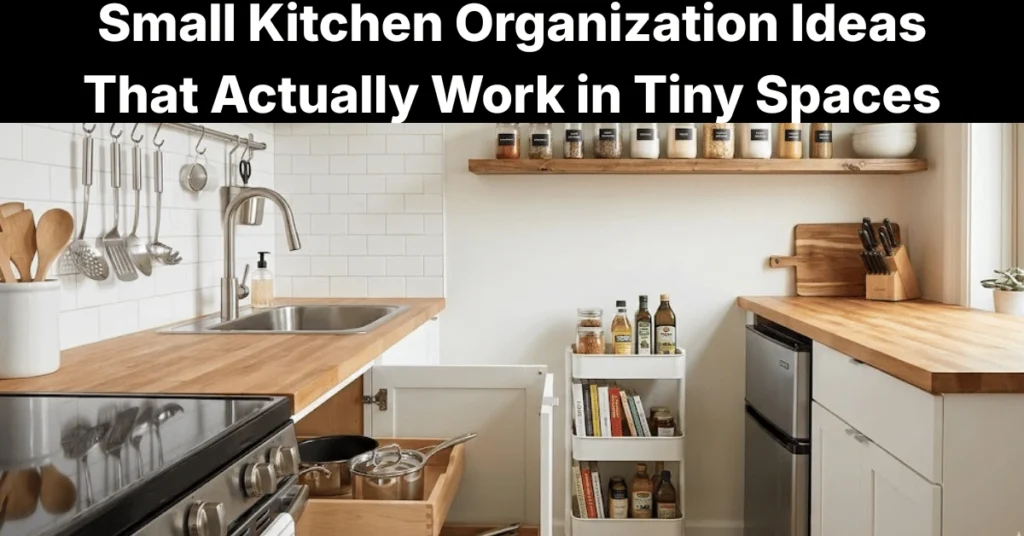
Nearly 50% of U.S. apartments built after 2010 include no dedicated pantry space [site: National Association of Home Builders, 2026]. That missing cabinet forces every dry good, canned item, spice, and snack onto whatever surface is available, and the result is a kitchen that feels permanently overcrowded no matter how often you clean it.
Organizing a kitchen with no pantry means replicating what a pantry does across every available surface: cabinets, drawers, counters, walls, and nearby closets. This article follows a proven sequence: audit first, then zone, then maximize cabinets, then build vertical storage, then introduce pantry-alternative furniture, then adjust shopping habits, then address renter constraints, and finally protect food safety. Each step reduces clutter, cuts food waste, and makes a pantry-free kitchen function as well as one that has dedicated storage.
Why Is Organizing a Kitchen with No Pantry More of a System Problem Than a Space Problem?
Disorganization in a no-pantry kitchen stems from a missing system, not simply a lack of space. The absence of a fixed location for each food category forces every grocery run to compete with whatever is already on the shelf, creating a cycle of overflow that cleaning alone cannot fix.
A pantry performs three functions: it categorizes food by type, contains it in a defined boundary, and makes it accessible by frequency of use. A no-pantry kitchen needs to replicate all three functions across cabinets, drawers, counters, and walls. That replication requires a deliberate zone system, not more storage bins.
The audit-first approach is the foundation. Before any product gets purchased, you need a clear inventory of what is actually in the kitchen, what belongs there, and what is consuming space without earning it.
What Should You Audit in Your Kitchen Before Buying Any Storage Products?
Before buying any storage products for a kitchen with no pantry, you should audit every item currently occupying cabinet, counter, and drawer space to remove what does not belong. Items to audit in your kitchen before purchasing storage solutions are listed below.
- Current cabinet contents by category: Pull everything out and group by type (dry goods, canned goods, baking supplies, cookware, tools) to see the actual volume in each category.
- Duplicate items: Identify multiples of the same product, for example three open bags of pasta or two half-used bottles of olive oil, and consolidate before organizing.
- Expired food: Check every packaged item for expiry dates. The USDA estimates that 30 to 40% of the U.S. food supply is wasted annually, and expired cabinet items are a direct contributor [site: USDA, 2026].
- Unused cooking tools and gadgets: Remove any tool not used in the past 60 days. Single-use gadgets (avocado slicers, cherry pitters) consume disproportionate drawer space for their utility.
- Oversized or duplicate cookware: A second stockpot or an oversized roasting pan used once a year belongs in secondary storage, not a primary cabinet in a no-pantry kitchen.
How Does a Small Appliance Audit Free Up Critical Cabinet and Counter Space?
A small appliance audit frees up critical kitchen space by removing the single largest category of space consumers from both counters and cabinets. Small appliances occupy 30 to 50% of counter surface area in the average U.S. apartment kitchen [site: NKBA Kitchen Space Study, 2026].
The standard evaluation test is use frequency. An appliance used daily (coffee maker, toaster) earns counter space. One used weekly or less (stand mixer, waffle iron, blender) moves to a secondary cabinet or another room. One used monthly or never goes to garage storage or donation.
Questions to evaluate each small appliance are listed below.
- Did you use this appliance in the past 30 days?
- Does this appliance perform a task that another appliance already handles?
- Would you replace this appliance within one week if it broke?
- Does the appliance’s physical size justify the storage space it occupies relative to its use frequency?
How Do You Create Food Zones in a Kitchen with No Pantry?
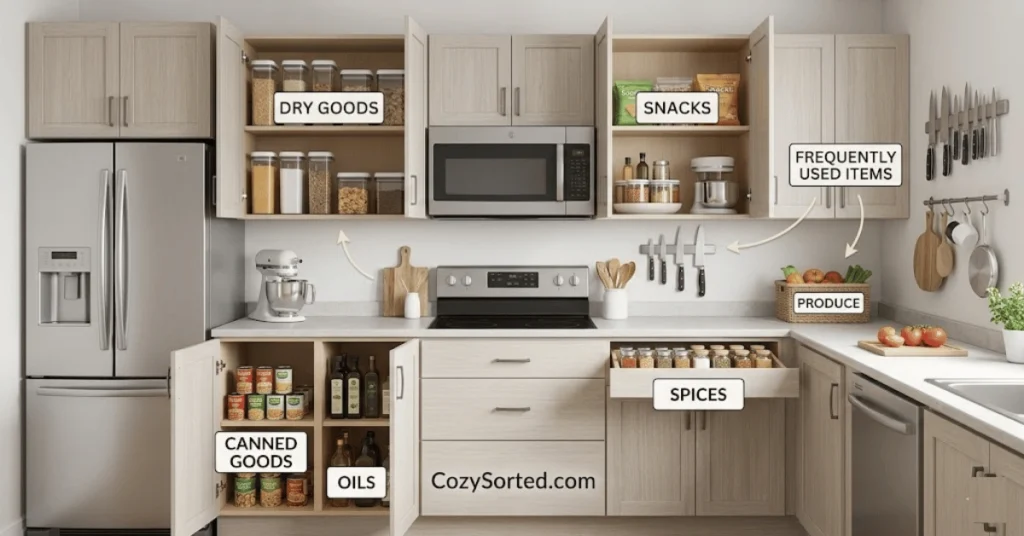
Creating food zones in a kitchen with no pantry means assigning a specific, consistent location to each category of food across all available surfaces — cabinets, drawers, counters, and walls. A zone system replicates pantry function by giving every item a home it always returns to, which eliminates the random stacking that makes no-pantry kitchens feel unmanageable.
Without zones, a cabinet becomes a general-purpose storage space where cooking oil ends up next to cereal, and spices get buried behind canned goods. With zones, restocking after a grocery run takes two minutes because every category has a fixed address.
The three pillars of a no-pantry zone system are: defining the food categories that need zones, assigning those categories to specific surfaces based on use frequency, and treating dry goods and baking supplies as a dedicated sub-system within the overall layout.
What Categories of Food Need Their Own Designated Zone in a Pantreless Kitchen?
The food categories that need their own designated zone in a pantreless kitchen are those used at different frequencies and requiring different storage conditions. Food categories requiring dedicated zones in a no-pantry kitchen are listed below.
- Dry goods (pasta, rice, lentils, oats, flour, sugar): Store in airtight containers on one dedicated cabinet shelf. These are used weekly and need pest-proof containment.
- Canned goods (beans, tomatoes, broth, tuna): Store in a tiered can rack on a lower cabinet shelf. FIFO rotation — older cans at front, newer at back — applies here.
- Baking supplies (baking powder, baking soda, yeast, vanilla, cocoa): Group together in one bin or on one shelf section. Baking supplies are used together and should be stored together.
- Snacks (crackers, nuts, dried fruit, granola bars): Assign one dedicated bin or basket on an accessible middle shelf or in a rolling cart.
- Condiments and oils (olive oil, vinegar, soy sauce, hot sauce): Store near the stove on a counter-safe tray or in a lower cabinet, separated from dry goods to prevent flavor transfer.
- Counter-safe produce (tomatoes, avocados, bananas, onions, garlic): Assign a counter bowl or hanging produce basket. These items lose quality inside a refrigerator or cabinet.
- Spices: Assign a wall-mounted rack, magnetic fridge panel, or dedicated drawer insert. Spices stored near heat or light lose potency within 6 months [site: FDA Food Labeling Guidelines, 2026].
How Do You Assign Zones to Cabinets, Drawers, Counters, and Walls?
Assigning food zones to cabinets, drawers, counters, and walls in a no-pantry kitchen works by mapping each food category to the surface that matches its use frequency and physical requirements. Daily-use items go at eye level and arm’s reach. Rarely used items go high, low, or to the back.
The core assignment logic is access speed. A food category you reach for twice a day belongs at the most accessible point in the kitchen. One you use twice a month belongs in the least accessible spot.
| Surface | Best Zone Assignment | Frequency Logic |
| Upper cabinets (eye level) | Dry goods, snacks, canned goods | Used weekly |
| Upper cabinets (above eye level) | Bulk backstock, rarely used items | Used monthly |
| Lower cabinets | Oils, condiments, heavy canned goods | Used weekly |
| Drawers | Spice inserts, foil/wrap, small tools | Used daily |
| Counter surface | Coffee station, produce bowl, oil tray | Used daily |
| Wall-mounted storage | Spice jars, frequently used oils | Used daily |
| Rolling cart shelves | Snacks, baking supplies, overflow dry goods | Used weekly |
What Is the Best Way to Organize Dry Goods and Baking Supplies Without a Pantry?
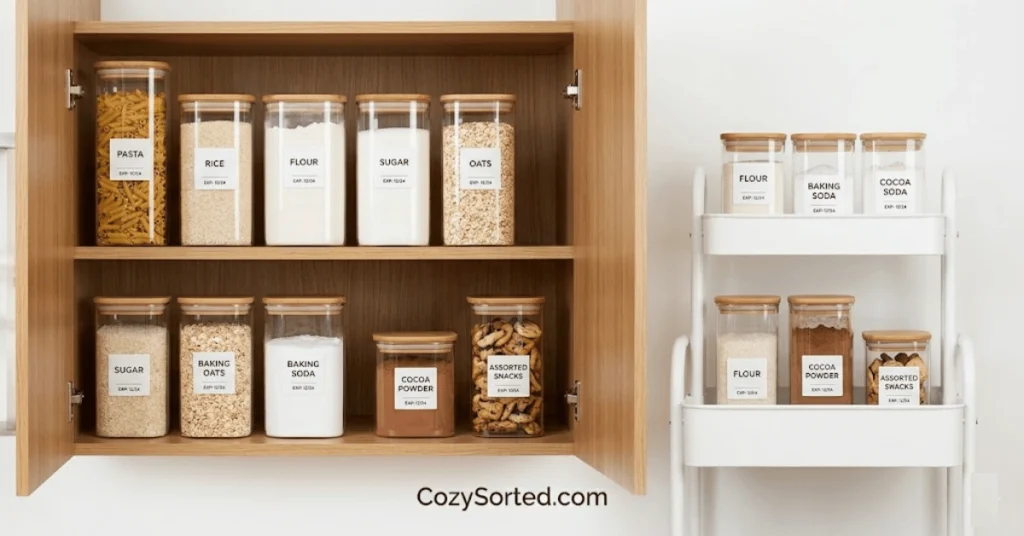
The best way to organize dry goods and baking supplies without a pantry is to use the decant-label-group method: transfer items out of original packaging into uniform airtight containers, label them, and group by use type. Original packaging wastes 20 to 40% of shelf space due to irregular shapes, oversized boxes, and half-empty bags that cannot stack [site: NKBA, 2026].
Steps to organize dry goods and baking supplies without a pantry are given below.
- Audit every dry good and baking item in the kitchen and discard any package that is expired or less than 10% full.
- Choose a uniform container set in 2 to 3 sizes: small (for spices, baking powder), medium (for pasta, rice, oats), and large (for flour, sugar). OXO POP containers and Rubbermaid Brilliance are two well-reviewed options with airtight push-button lids.
- Transfer each item from its original packaging into the appropriate container size, filling to 80% capacity to leave space for scooping.
- Label every container with the contents and the expiry date from the original package using a label maker or masking tape and a permanent marker.
- Group baking supplies together in one section: flour, sugar, baking soda, baking powder, vanilla, and cocoa all belong in the same cabinet zone or cart shelf so you never search across multiple locations while baking.
- Arrange containers by use frequency: items used daily at the front, items used weekly in the middle, items used monthly at the back.
How Can You Maximize Cabinet Space When Your Kitchen Has No Pantry?
Maximizing cabinet space in a kitchen with no pantry requires treating every cubic inch as usable real estate and eliminating the dead zones that develop in deep cabinets, around pipes, and in unstructured shelf space. Cabinet maximization produces the single largest storage gain available in a no-pantry kitchen because cabinets are the primary storage surface and most renters use them at 40 to 60% of their actual capacity [site: NKBA Small Kitchen Study, 2026].
The three strategies that recover the most cabinet space are deep cabinet organization (eliminating the dead back zone), a dry goods decanting system (replacing irregular packaging with stackable containers), and a tiered canned goods system with FIFO rotation.
Applied together, these three approaches increase usable cabinet capacity by 30 to 50% without adding any new furniture or storage units.
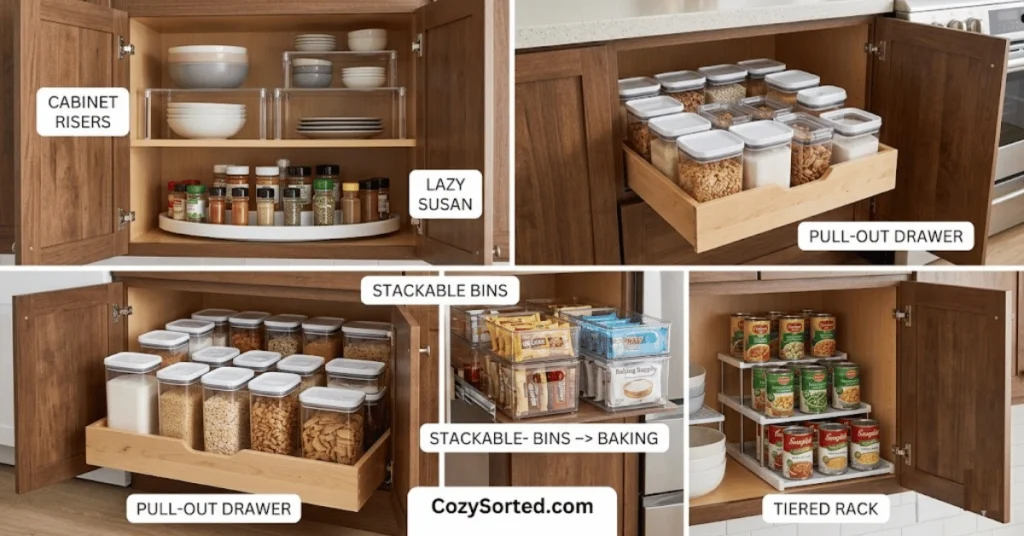
Example: A standard 12-inch deep upper cabinet holds two rows of items. With a cabinet riser shelf added, it holds four rows. That single $15 product doubles the usable vertical space in that cabinet.
How Do You Organize Deep Kitchen Cabinets to Eliminate Dead Space?
Organizing deep kitchen cabinets to eliminate dead space involves dividing each cabinet into a front zone for daily items and a back zone for bulk or infrequently used items. The back 4 to 6 inches of a deep kitchen cabinet is wasted in 80% of home kitchens because standard shelf placement forces items to stack in front of each other [site: NKBA, 2026].
The zone-within-a-zone concept treats the front half of each shelf as prime real estate and the back half as secondary storage. Tools to organize deep kitchen cabinets and eliminate dead space are listed below.
- Lazy Susans (turntable organizers): Place in corner cabinets or deep upper cabinets to rotate back-row items into reach with a single spin. Available in 9-inch and 12-inch diameters for $8 to $20 at most retailers.
- Cabinet riser shelves: Add a second elevated tier within one cabinet shelf, effectively doubling the number of rows. Works best for canned goods, spice jars, and mugs.
- Pull-out drawer inserts: Slide-out drawer systems fit inside existing cabinet shelves and pull the back-row items forward on demand. Sold in widths from 10 to 21 inches to match standard cabinet dimensions.
- Stackable bins with handles: Place one bin in the front zone and one in the back zone. Pull the back bin forward by its handle to access items. Keeps the back zone usable without reaching blind.
- Over-shelf hanging baskets: Hang below an existing shelf to create a bonus storage tier for lightweight items like foil rolls, plastic bags, and small snack packs.
What Is a Dry Goods Decanting System and How Do You Set One Up?
A dry goods decanting system is a method of transferring loose dry goods from original packaging into uniform airtight containers to save space, extend freshness, and create visual clarity across kitchen storage. Uniform containers stack where irregular packages cannot, recovering 25 to 35% of cabinet shelf space per zone [site: Food Storage Research, University of Minnesota Extension, 2026].
Steps to set up a dry goods decanting system are listed below.
- Audit all dry goods and identify every item stored in its original bag, box, or package. These are decanting candidates.
- Choose a uniform container system in two or three sizes. OXO POP (airtight push-button lid), Rubbermaid Brilliance (crystal-clear BPA-free plastic), and Anchor Hocking glass canisters are three systems with verified airtight seals.
- Transfer each item from its original packaging into the correct size container. Fill to 80% to allow easy scooping and lid closure.
- Label each container with the food name and original expiry date. Use a label maker or masking tape. Include the date of transfer for items with no printed expiry.
- Arrange containers by use frequency: pasta and rice at the front (used weekly), specialty flours and grains at the back (used monthly).
How Should You Organize Canned Goods in Kitchen Cabinets Without a Pantry?
Organizing canned goods in kitchen cabinets without a pantry works best when cans are stored on a tiered rack system with FIFO rotation. A tiered can rack recovers 40% more shelf space compared to single-row flat storage by stacking cans in angled rows that roll forward automatically [site: Kitchen Storage Research, 2026].
FIFO stands for First In, First Out, a rotation method where older cans sit at the front and newer cans load from the back. This prevents cans from expiring unnoticed at the back of a cabinet.
Tips for organizing canned goods in kitchen cabinets without a pantry are listed below.
- Install a tiered can dispenser rack rated for your cabinet depth. Standard racks hold 12 to 36 cans in 2 to 4 rows and cost $12 to $30 at major retailers.
- Group cans by food category on the rack: proteins (tuna, beans) on one row, tomato products (paste, diced, sauce) on a second row, broths and soups on a third.
- Load new cans from the back and let older cans roll to the front naturally. Check the front row during every grocery restock.
- Label the rack section with the category name using a small adhesive label on the rack frame so the system maintains itself even when someone else restocks the cabinet.
How Do You Use Vertical Space to Replace Pantry Storage in a Small Kitchen?
Using vertical space to replace pantry storage in a small kitchen means treating walls and upper surfaces as active storage zones rather than empty background. Vertical wall storage adds 15 to 30 square feet of usable storage surface in an average kitchen without occupying any floor or counter space [site: NKBA, 2026].
Walls are the most underused storage dimension in a no-pantry kitchen. Most kitchens have 8 to 10 feet of vertical wall height, yet storage stops at the cabinet line, typically 7 feet from the floor. The zone from countertop to cabinet base, and the wall surface beside and above cabinets, represents recoverable storage real estate.
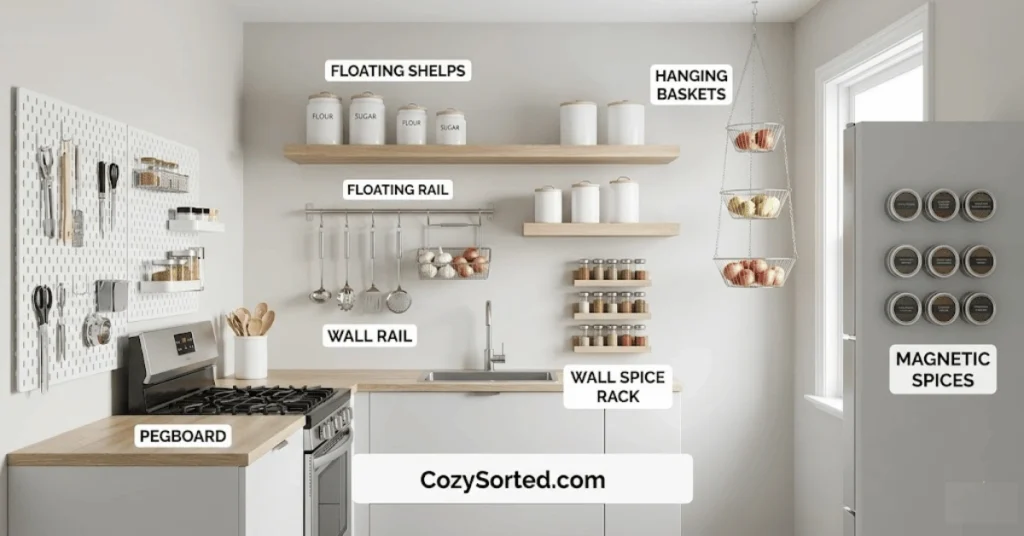
The three vertical strategies that produce the most pantry-equivalent storage are floating shelf systems, pegboard panels, and wall-mounted spice solutions.
What Floating Shelf and Wall Rail Systems Work Best in a No-Pantry Kitchen?
The floating shelf and wall rail systems that work best in a no-pantry kitchen are those that mount between countertop and cabinet height or on exposed wall sections beside the main cabinet run. Best floating shelf and wall rail systems for a no-pantry kitchen are listed below.
- Floating wood shelves (12-inch depth, 24 to 36 inches wide): Mount between upper cabinets and countertop on an exposed wall section. Store cooking oils, vinegar, frequently used spices, and small jars. Weight capacity ranges from 20 to 50 lbs depending on bracket type and wall anchor.
- IKEA KUNGSFORS rail system: A stainless steel wall rail that accepts hanging bins, hooks, and magnetic knife strips. Designed specifically for kitchen walls. Costs $15 to $40 for a full rail section with accessories.
- Wall-mounted grid panels (pegboard alternative): Powder-coated steel grids mount to wall studs and accept S-hooks, small baskets, and shelf brackets. Available in 12×24-inch and 24×36-inch panels for $20 to $45.
- Narrow ledge shelves above counters: A 4-inch deep ledge shelf mounted 6 inches above the countertop holds spice jars, small oil bottles, and frequently used condiments without consuming counter surface. Requires minimal wall depth clearance.
How Do You Use a Pegboard System for Kitchen Organization?
A pegboard system for kitchen organization works by mounting a perforated hardboard panel to a wall and inserting hooks, bins, and small shelves into the holes to create a fully customizable, rearrangeable storage grid. A 24×48-inch pegboard panel adds 8 square feet of active storage surface to a kitchen wall at a material cost of $15 to $30 [site: Home Depot Product Specifications, 2026].
Steps to set up a kitchen pegboard system are given below.
- Choose the board size based on the available wall section. A 24×36-inch panel suits most apartment kitchens. Standard pegboard uses 3/16-inch holes on a 1-inch grid.
- Mount the board with standoff spacers (1-inch minimum) between the board and wall. Spacers allow hooks to insert fully and prevent wall contact that blocks hook placement.
- Add hooks for utensils: Hang ladles, spatulas, tongs, and whisks on single hooks. Group by function (cooking tools, baking tools, serving tools).
- Add small bins for spices and oils: Attach pegboard-compatible bins to store spice jars and small condiment bottles vertically on the board surface, freeing cabinet space.
- Add a small pegboard shelf for a cookbook stand, a small appliance, or a container of cooking utensils that previously occupied counter space.
Recommended Video: Search YouTube for “kitchen pegboard organization setup no pantry apartment 2026” to watch a step-by-step visual guide on mounting and accessory placement.
Which Spice Organization Solutions Work Best When You Have No Pantry?
The spice organization solutions that work best in a no-pantry kitchen are those that move spices entirely off cabinet shelves and onto walls, doors, or drawer surfaces. Spice organization solutions for a kitchen with no pantry are listed below.
- Magnetic spice tins on fridge side panel: Small magnetic tins (2-inch diameter) mount to any magnetic surface and hold 2 to 4 oz of spice each. A set of 20 tins costs $20 to $35 and frees an entire cabinet shelf.
- Wall-mounted spice rack: A two-tier metal wall rack mounts between the countertop and cabinet bottom, holds 12 to 20 standard spice jars, and costs $15 to $35.
- Drawer spice insert: A slanted foam or bamboo drawer insert angles spice jars face-up inside a standard kitchen drawer. The full label of each jar reads at a glance without lifting anything.
- Tiered cabinet shelf for spice jars: A two-tier riser shelf placed inside a cabinet creates a stepped display of 16 to 24 spice jars. Front row and back row both remain visible and accessible.
- Over-door spice organizer: A clip-on door rack holds 8 to 16 spice jars on the inside of a cabinet door, converting dead door space into active storage.
What Are the Best Pantry Alternative Furniture Solutions for a Kitchen with No Pantry?
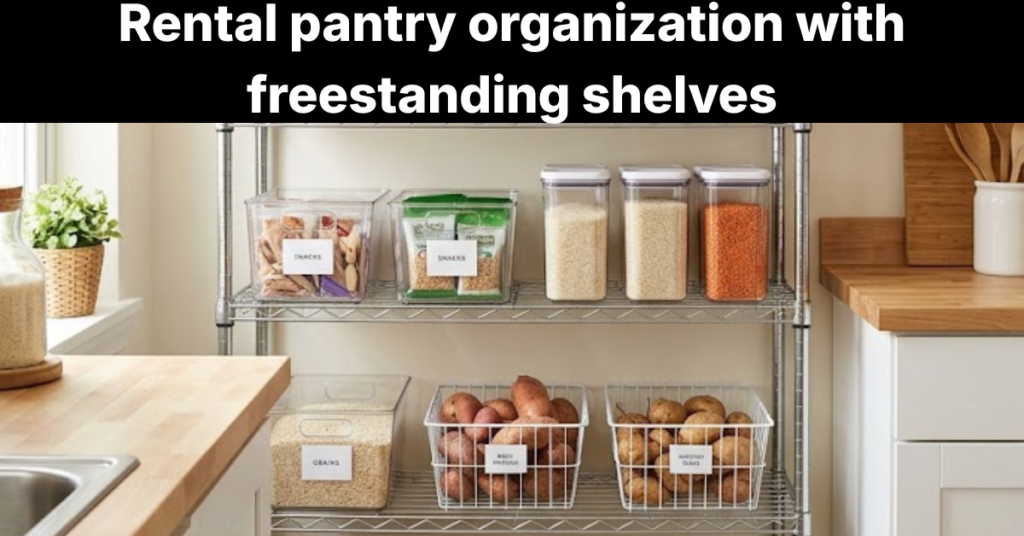
The best pantry alternative furniture solutions for a kitchen with no pantry are freestanding pieces that add storage capacity without permanent installation and can be repositioned or removed at move-out. Freestanding furniture-as-pantry systems increase total kitchen storage volume by 20 to 45% depending on unit size and configuration [site: NKBA Small Kitchen Storage Report, 2026].
Furniture-as-pantry means treating a rolling cart, open shelving unit, wardrobe, or converted closet as the dedicated food storage zone your kitchen is missing. The piece stands independently, requires no wall anchors or drilling in most cases, and provides the category separation and containment that a built-in pantry delivers.
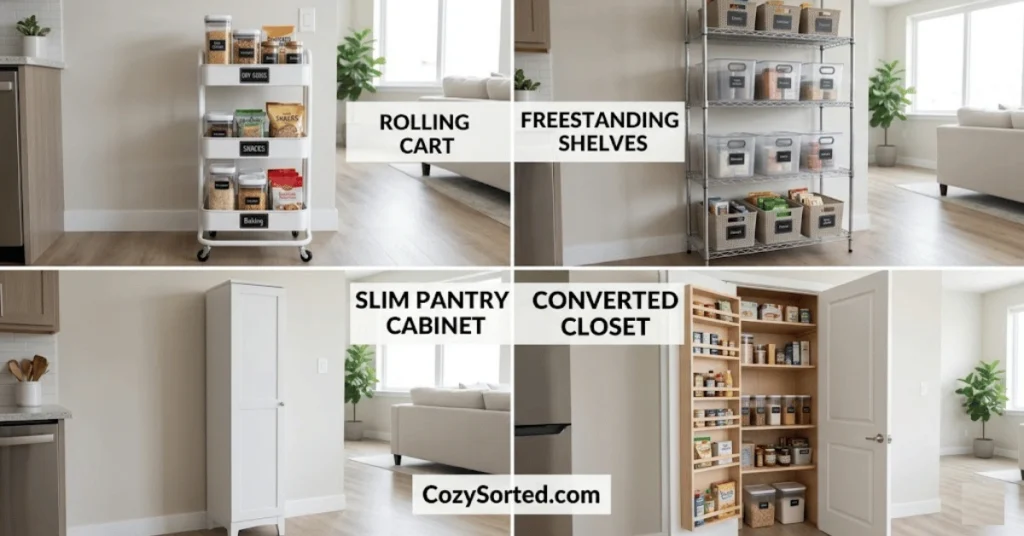
The three furniture strategies that produce the best pantry-equivalent results are rolling cart pantries, freestanding shelving units, and closet conversions.
How Do You Turn a Rolling Cart into a Functional Mobile Pantry?
Turning a rolling cart into a functional mobile pantry works by assigning one shelf per food category and adding labeled bins to each shelf to create a zone system on wheels. A three-shelf rolling cart with a locking drawer adds 6 to 12 cubic feet of pantry-equivalent storage at a cost of $40 to $120, which is significantly less than built-in cabinetry [site: IKEA, The Container Store product pricing, 2026].
Steps to configure a rolling cart as a mobile pantry are listed below.
- Choose a cart with a minimum of three shelves and one drawer. The IKEA RÅSKOG utility cart ($39.99) and the Seville Classics 3-tier rolling cart ($60 to $90) are two well-reviewed options for kitchen use.
- Assign one food category per shelf: top shelf for snacks and dry goods, middle shelf for canned goods and condiments, bottom shelf for baking supplies and bulk items.
- Add small bins or baskets to each shelf to contain items within their zone and prevent rolling or tipping when the cart moves.
- Label each shelf section with the category name using adhesive labels or a label maker. Labels maintain the system when other household members restock.
- Position the cart in the dead zone between kitchen appliances, beside the refrigerator, or at the kitchen entrance to maximize proximity to the cooking zone without blocking traffic flow.
When Does a Freestanding Shelving Unit or Cabinet Make Sense as a Pantry Replacement?
A freestanding shelving unit or cabinet makes sense as a pantry replacement when the kitchen has an adjacent wall section with 12 to 18 inches of floor depth available, when the renter needs a no-drill solution, or when existing cabinets are fully at capacity. A full-height freestanding pantry cabinet adds 20 to 35 cubic feet of closed storage in a footprint of 24×15 inches [site: IKEA PAX Product Specifications, 2026].
Three options cover most no-pantry kitchen scenarios:
- IKEA PAX wardrobe system: Available in 15-inch and 19-inch depths, with interior shelving and door configurations that convert it into a fully functional food pantry. Costs $150 to $400 depending on size and door choice.
- Wire shelving units (Honey-Can-Do, Amazon Basics): Open-frame units with adjustable shelves, 4 to 5 tiers, hold 250 to 350 lbs total. Cost $30 to $80. Best for a visible, well-organized display pantry.
- Solid wood pantry cabinets (freestanding, no installation): Enclosed units with doors that conceal food storage. More aesthetically neutral in an open kitchen layout. Cost $120 to $400 at Target, Walmart, or IKEA.
How Can You Convert a Nearby Closet or Hallway into a Makeshift Pantry?
Converting a nearby closet or hallway into a makeshift pantry involves identifying an underused enclosed space adjacent to the kitchen and installing adjustable shelving to create food storage zones. A standard coat closet converted to pantry use adds 15 to 25 cubic feet of food storage without any construction [site: National Association of Home Builders, 2026].
Steps to convert a closet or hallway space into a functional pantry are given below.
- Identify the candidate space: coat closet, hall cupboard, under-stair storage, or a deep hallway alcove within 10 feet of the kitchen.
- Measure interior depth, width, and height before purchasing shelving. Record the measurement of any obstructions (pipes, electrical boxes) that affect shelf placement.
- Install adjustable freestanding shelving or tension-mounted shelf systems that require no drilling. ClosetMaid and Rubbermaid both make tension-pole shelving systems rated for 50 lbs per shelf.
- Group food zones on shelves using the same zone logic as the main kitchen: dry goods on one shelf, canned goods on another, baking supplies on a third.
- Add a door organizer to the inside of the closet door for small items: spice jars, condiment packets, cooking oils, and foil rolls.
- Label each zone with the food category so the system remains consistent across every grocery restock.
Should the Way You Shop Change When Your Kitchen Has No Pantry?
Whether or not shopping habits should change when your kitchen has no pantry depends entirely on current buying volume versus available storage capacity. Large bulk shops create storage demand that a no-pantry kitchen cannot absorb without overflow onto counters, floors, or secondary rooms. A smaller, more frequent shop aligns purchasing volume to the real capacity of the kitchen’s storage zones. The moment buying volume exceeds storage capacity, the zone system breaks down and the kitchen reverts to clutter regardless of how well it is organized.
How Do Your Grocery Habits Need to Shift to Work with a No-Pantry Kitchen?
Grocery habits that work with a no-pantry kitchen prioritize buying frequency over buying volume, and buying only what fits within the defined food zones at their current capacity. Over-buying is the primary cause of no-pantry kitchen disorganization, because excess food has no zone to return to and ends up stacked randomly on the first available surface [site: USDA Economic Research Service, 2026].
The shift is straightforward: replace one large weekly shop with two smaller shops every 3 to 4 days. This keeps each food zone at 70 to 80% capacity, which is the ideal load for accessible, organized storage. A fully packed zone forces items out of their assigned location.
Avoid bulk formats entirely unless a secondary storage space (garage, utility closet, storage unit) absorbs the overflow. Buying a 25-lb bag of rice saves money but consumes three times the cabinet space of a 5-lb bag, which defeats the zone system.
How Does Shopping Frequency Affect Storage Demands in a Small Kitchen?
Shopping frequency directly affects storage demands in a small kitchen because each additional day between shopping trips increases the volume of food that must be stored simultaneously. A once-weekly shop for a household of two requires 7 days of food to be stored at once. A twice-weekly shop reduces that simultaneous storage load by 50%. The USDA recommends that households without dedicated pantry space align their shopping frequency to their refrigerator and cabinet capacity rather than a fixed weekly schedule [site: USDA Food Safety and Inspection Service, 2026]. A weekly shop model works when the kitchen’s total storage volume covers 7 days of food volume for the household. A no-pantry kitchen that cannot absorb that volume without overflow requires a shift to 3 to 4 day shopping intervals.
What Grocery List Strategy Prevents a No-Pantry Kitchen from Becoming Overcrowded?
The grocery list strategy that prevents a no-pantry kitchen from becoming overcrowded is a zone-aligned grocery list, organized by food category to match the kitchen’s designated storage zones. A zone-aligned list prevents buying more of a category than its assigned zone can hold because the zone’s current capacity is visible before shopping.
Steps to build a zone-aligned grocery list for a no-pantry kitchen are given below.
- Check each food zone before writing the list. Open the dry goods shelf, the canned goods rack, the snack bin, and the produce bowl and note what is at 50% capacity or below.
- Write the list by zone category, not by store aisle. Dry goods: pasta (low), rice (full, skip), oats (low). Canned goods: beans (low), tomatoes (full, skip).
- Set a quantity cap per zone: buy only enough to bring the zone to 80% capacity, not 100%. A zone at 100% has no room for FIFO rotation.
- Cross-reference meal plans against zone capacity before finalizing the list. If a recipe requires a full bag of flour and the baking zone already holds three partial bags, consolidate before buying more.
- Review the list against available storage one final time before leaving for the store. Items without a zone assignment go back off the list.
What Are the Best No-Drill Renter-Friendly Pantry Storage Solutions?
The best no-drill, renter-friendly pantry storage solutions work without wall damage or permanent installation and remove cleanly at move-out. Approximately 44 million U.S. households rent their home and face lease restrictions that prohibit drilling, wall anchors, or permanent cabinet modification [site: U.S. Census Bureau, 2026]. These restrictions eliminate most traditional shelving options and require storage systems that rely on tension, gravity, adhesion within rated limits, or freestanding weight distribution.
The two solution categories that cover most renter needs are over-door organizers and tension-based tools (zero wall contact required) and freestanding units (no installation at all).
Which Over-the-Door and Tension-Rod Organizers Work Without Damage to Walls?
Over-the-door and tension-rod organizers that work without wall damage in a no-pantry kitchen include clip-on and hook-based systems that grip cabinet door panels without screws. Best no-drill over-door and tension-rod organizers for a no-pantry kitchen are listed below.
- Clear over-door hanging organizer (Simple Houseware, Whitmore): Clips onto cabinet doors 0.5 to 1.25 inches thick and holds 6 to 12 clear pockets for snacks, spice packets, and small dry goods. Costs $10 to $20.
- Over-door spice rack (Yucaipa, Spectrum Diversified): A two to four-tier rack that clips over a cabinet door and holds 12 to 24 standard spice jars without any screws or adhesive.
- Tension rod under-sink dividers: Spring-tension rods mount between cabinet side walls to create hanging zones for spray bottles, freeing the cabinet floor for bins. Hold 10 to 15 lbs at full spring compression.
- Over-cabinet door hook baskets (3M Command adhesive basket or clip-on wire basket): Attach to cabinet doors to hold rubber gloves, sponges, or small pouches. Command adhesive versions hold up to 7.5 lbs. and remove cleanly with no residue.
What Freestanding Storage Options Require No Installation at All?
Freestanding storage options that require no installation for a no-pantry kitchen include units that stand on their own weight and require no anchoring, drilling, or wall contact. Freestanding no-installation storage solutions for a no-pantry kitchen are listed below.
- Rolling utility cart (IKEA RÅSKOG, Seville Classics): Three to four shelves on locking casters. No wall contact required. Positions beside the refrigerator or at the kitchen edge. Holds 30 to 80 lbs. depending on frame construction.
- Wire shelving unit (Honey-Can-Do, Amazon Basics 5-tier): Free-standing open-frame unit with adjustable shelves. Assembles in under 10 minutes with no tools. Holds 200 to 350 lbs. total across all tiers.
- Freestanding pantry cabinet (IKEA, Target, Walmart): Closed-door cabinet that stands on its own base. Requires no wall anchors in most configurations under 72 inches tall.
- Countertop tiered organizer (design, Yucaipa): A two to three-tier riser placed directly on the counter. Elevates rear items to eye level and doubles usable counter-top storage rows.
- Hanging produce basket stand (three-tier banana stand style): A floor-standing or counter-mounted frame that holds produce in open wire baskets at three heights. Keeps bananas, onions, garlic, and citrus off the counter and out of the refrigerator.
How Do You Keep Pantry Staples Fresh and Pest-Free Without a Dedicated Pantry Space?
Keeping pantry staples fresh and pest-free without a dedicated pantry space requires airtight containment, controlled storage temperature, and consistent pest barrier maintenance across every open cabinet and counter zone. An enclosed pantry limits exposure to heat, humidity, light, and insects naturally. A no-pantry kitchen has none of those built-in protections, making deliberate container selection and placement the only reliable substitute.
Open cabinets near a stove expose dry goods to heat cycling that degrades food quality 2 to 3 times faster than cool, dark pantry storage [site: USDA Food Safety Guidelines, 2026]. Counter storage exposes food to ambient kitchen humidity, which averages 50 to 70% in an active cooking environment and accelerates spoilage in unsealed packaging.
| Storage Condition | Pantry (Enclosed) | No-Pantry Cabinet | Counter Storage |
| Light exposure | Minimal | Moderate | High |
| Heat exposure | Low | Moderate (near stove) | High |
| Humidity exposure | Low | Low to moderate | Moderate to high |
| Pest exposure | Low (sealed space) | Moderate | High |
| Required container type | Any | Airtight preferred | Airtight required |
What Storage Conditions Do Dry Goods, Canned Goods, and Spices Require?
Dry goods, canned goods, and spices each require specific storage conditions to remain fresh and safe beyond their labeled shelf life. Recommended storage conditions for pantry staples are outlined below.
- Dry goods (flour, sugar, pasta, rice, oats): Store in airtight containers at or below 70°F (21°C) in a dark, dry location. Humidity above 60% causes clumping, mold, and accelerated spoilage. The FDA recommends all-purpose flour stored in airtight containers at room temperature remains fresh for 6 to 8 months [site: FDA, 2026].
- Canned goods (beans, tomatoes, broth, tuna): Store below 75°F (24°C) and away from heat sources including stoves, dishwashers, and radiators. The USDA states that high-acid canned goods (tomatoes, fruit) last 12 to 18 months, and low-acid canned goods (beans, meat, broth) last 2 to 5 years under proper temperature conditions [site: USDA, 2026].
- Spices (ground and whole): Store away from direct heat and light. A cabinet above or beside the stove reduces spice potency by up to 50% within 3 months due to repeated heat exposure. Ideal storage temperature is 50 to 68°F (10 to 20°C) [site: FDA Spice and Seasoning Guidelines, 2026].
Which Container Types Best Protect Food Quality in Open or Cabinet Storage?
The container types that best protect food quality in open or cabinet kitchen storage are those with verified airtight seals rated for dry goods and liquid exclusion. Best container types for protecting food in a no-pantry kitchen are listed below.
- Airtight glass canisters (Anchor Hocking, Bromoil Rocco): Glass is non-porous, odor-neutral, and prevents moisture penetration. Best for flour, sugar, pasta, and coffee. Dishwasher-safe. Costs $8 to $25 per canister.
- BPA-free airtight plastic canisters (Rubbermaid Brilliance): Lightweight, stackable, and shatter-resistant. The locking lid creates a four-point airtight seal. Best for dry goods and snacks stored in cabinets. Costs $5 to $15 per container.
- OXO POP containers: Push-button lid creates an airtight seal with one press. Available in 11 sizes from 0.5 qt to 4.4 qt. Best for flour, sugar, oats, rice, and pasta. Costs $10 to $25 per container.
- Wide-mouth mason jars (Ball, Kerr): Borosilicate glass with a two-part lid creates an airtight seal. Best for spices, dried beans, lentils, nuts, and seeds stored at counter or cabinet level. A 12-pack of quart jars costs $12 to $18.
- Metal tins with tight-fitting lids (for tea, coffee, biscuits): Opaque metal blocks light entirely, which makes tins the best option for light-sensitive items like coffee, matcha, and loose-leaf tea. Costs $5 to $20 per tin.
Organizing a kitchen with no pantry reduces food waste, recovers usable storage space, and builds a repeatable system across cabinets, walls, and furniture if every zone is defined before storage products are purchased.

Mike Mann writes practical home organization and small-space living guides for CozySorted. His work focuses on apartment-friendly storage, clutter-free routines, bedroom organization, and simple systems that help renters, apartment dwellers, and small-space homeowners create calmer, easier-to-maintain homes.