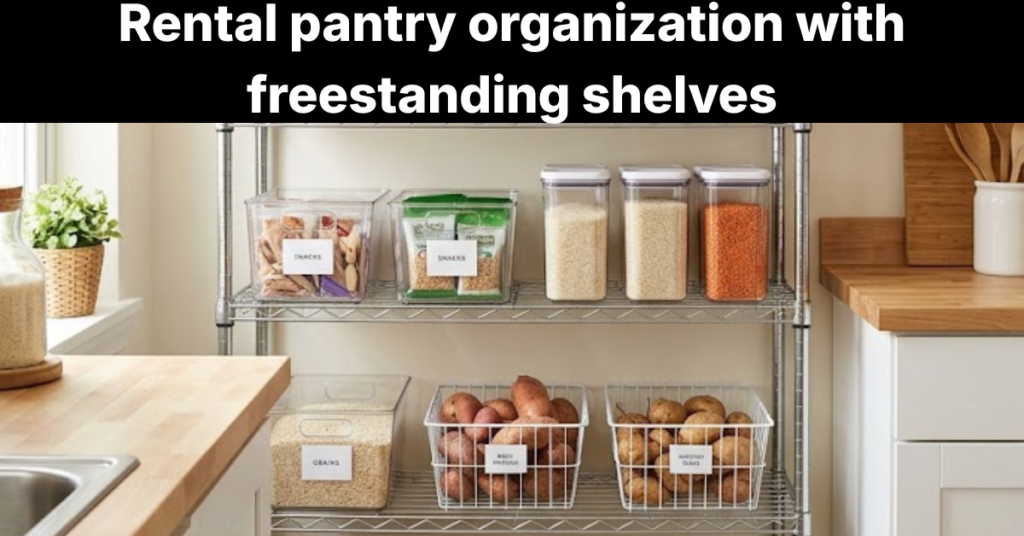
Renters lose an average of $200 to $500 from their security deposit due to wall and cabinet damage caused by drilling [site: National Apartment Association, 2026]. The space under a kitchen sink holds up to 15 cubic feet of usable storage, yet most renters leave it disorganized because they assume good storage requires permanent hardware.
No-drill under-sink storage organizing the space beneath a kitchen sink using damage-free tools tension rods, stackable bins, adhesive hooks, and freestanding organizers. This article covers the most effective no-drill methods, how to work around pipes and garbage disposals, and how to protect your cabinet from leaks, weight overload, and child safety risks.
Apply these renter-friendly kitchen storage ideas today and recover 30 to 50% of the usable cabinet space you are currently losing to clutter and poor layout.
What Are the Most Effective No-Drill Under-Sink Kitchen Storage Ideas?
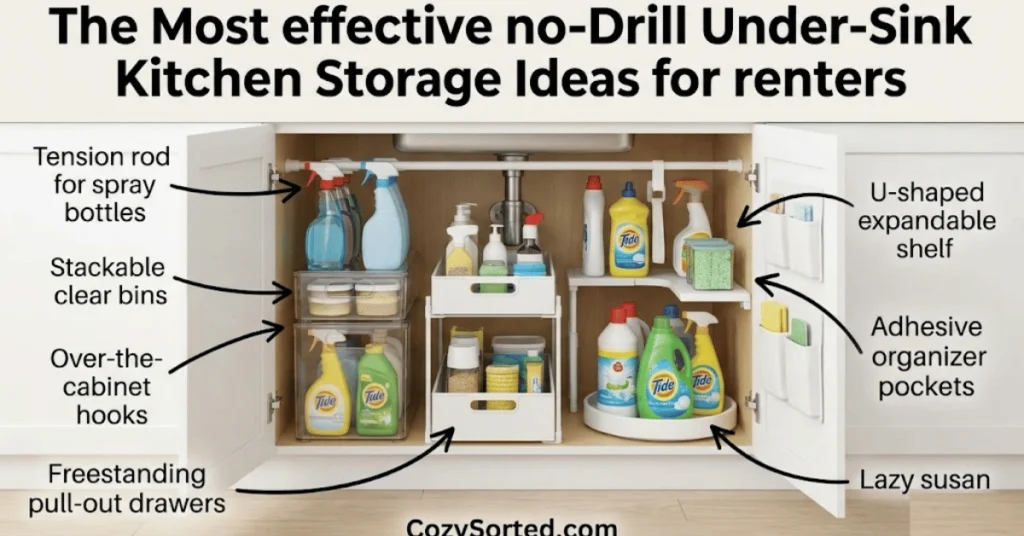
The most effective no-drill under-sink kitchen storage ideas involve using vertical space, tension-based hardware, and modular containers to organize around pipes and plumbing without touching the cabinet walls. 7 highly effective no-drill under-sink storage ideas are listed below.
- Tension rods mounted horizontally to hang spray bottles by their trigger heads, freeing up floor space inside the cabinet.
- Stackable clear acrylic bins organized by category (cleaning supplies, sponges, dish soap refills) with full visual inventory from the front.
- Over-the-cabinet-door hooks that clip onto the door panel to hold dish towels, gloves, and small pouches.
- Freestanding pull-out drawers on wheels or sliders that fit beside the P-trap pipe (the curved drain pipe under the sink) without contact.
- U-shaped or split-level expandable shelves that straddle the pipe system and create an upper and lower tier.
- Adhesive organizer pockets on the inner cabinet walls for small flat items like sponge refills and twist ties.
- Lazy Susans placed in the open zones beside the plumbing to rotate cleaning products into view without digging.
A well-configured no-drill setup turns dead cabinet space into organized, accessible storage if products are selected to match the pipe layout of your specific sink.
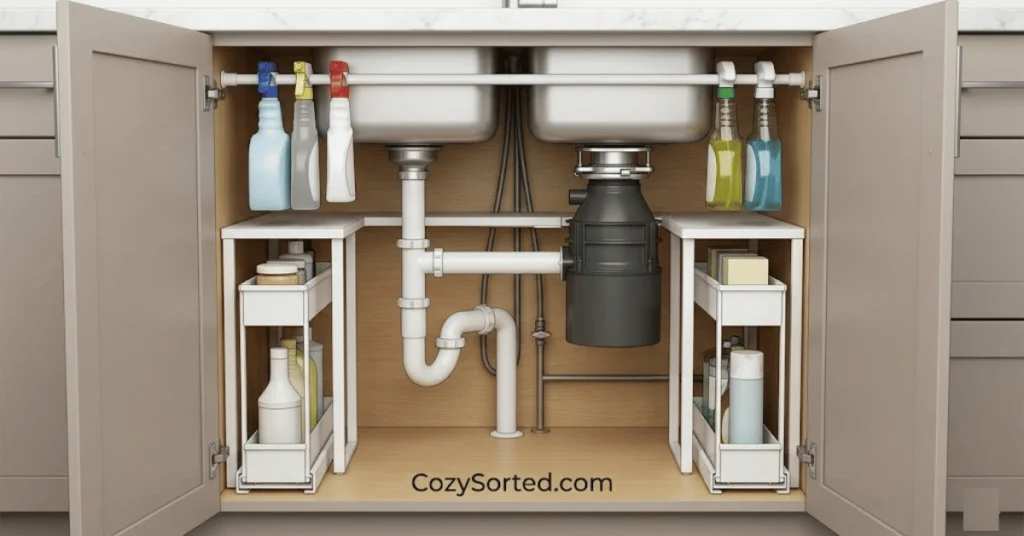
Example: A renter with a center-mounted garbage disposal uses two narrow pull-out caddies on either side rather than one wide shelf, recovering both lateral zones simultaneously.
How Do Tension Rods Maximize No-Drill Under-Sink Storage?
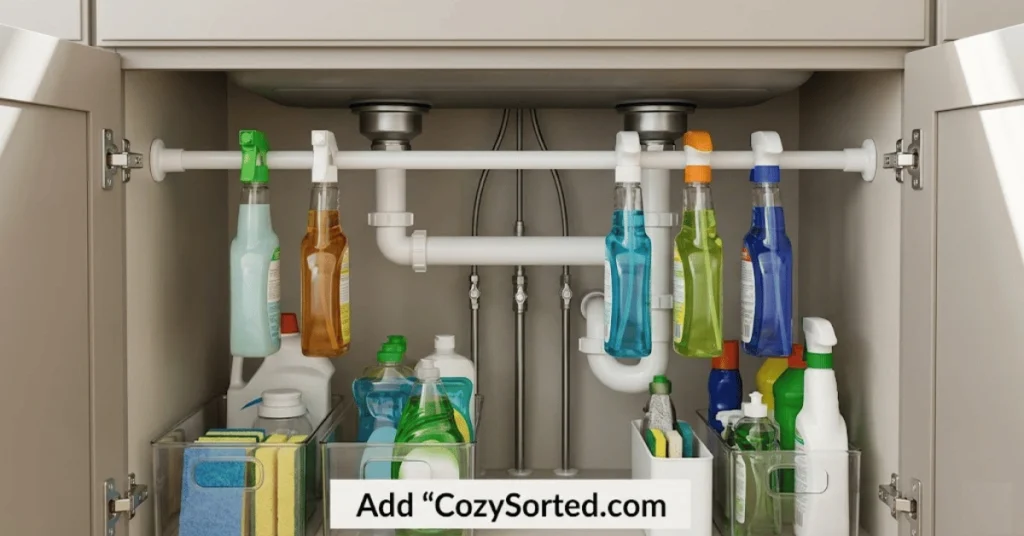
Tension rods maximize no-drill under-sink storage by using spring pressure against two cabinet walls to create a horizontal hanging rail with zero screws or adhesive. A tension rod rated for 10 to 15 lbs holds 4 to 6 standard spray bottles when positioned at the upper clearance zone above the pipe system [site: Consumer Product Safety Commission, 2026].
4 ways to use tension rods under the sink are given below.
- Hanging spray bottles upside down by their trigger handles keeps the floor zone clear for bins and freestanding organizers below.
- Stacking two rods at different heights creates a two-tier hanging system for bottles of different lengths without adding any hardware.
- Using a rod as a divider between two open bin zones prevents shorter containers from tipping sideways when the cabinet door opens.
- Mounting a rod across the back wall zone (from left wall to right wall) works in cabinets 18 to 36 inches wide, which covers most standard U.S. under-sink dimensions [site: NKBA Kitchen Design Standards, 2026].
Replace tension rods every 12 to 18 months if they carry spray bottles daily. The spring mechanism loses compression under constant lateral pressure over time.
What Role Do Stackable Clear Bins Play in Under-Sink Storage?
Stackable clear bins give under-sink storage a fixed category system that removes guesswork and prevents the cabinet from reverting to clutter. The primary roles of stackable clear bins in under-sink storage are outlined below.
- Visual inventory without opening containers: Clear walls let you see supply levels at a glance, so you never over-buy dish soap or run out of sponges mid-week.
- Modular stacking to use vertical clearance: Most under-sink cabinets provide 18 to 24 inches of vertical clearance above the pipe. Two stacked bins recover this zone fully.
- Spill containment for liquid products: A bin with raised edges contains leaks from dish soap or cleaning sprays before they reach the cabinet floor and cause warping.
- Category separation without labels: One bin holds sponges and scrubbers. One holds dish soap refills. One holds surface cleaners. Separation is visual, not written.
- Easy full removal for plumbing access: When a plumber needs access, bins slide out in seconds with no dismantling required, which matters in rental units where maintenance visits happen without advance notice.
Example: OXO Good Grips clear bins (available in 3-inch and 6-inch widths) fit side-by-side in a standard 24-inch cabinet with room for a tension rod overhead.
How Do Over-the-Cabinet Hooks Improve Under-Sink Storage?
Over-the-cabinet hooks improve under-sink storage by converting the interior cabinet door, which is the only completely flat, pipe-free surface in this space, into an active storage zone. 4 ways over-the-cabinet hooks improve under-sink storage are given below.
- Hanging dish towels and microfiber cloths on the door keeps them off the counter and out of the cabinet floor, where moisture can cause mildew.
- Mounting a small mesh pouch for rubber gloves and scrubbing pads on the door puts the highest-frequency items at immediate reach when you open the cabinet.
- Attaching a slim over-door organizer with multiple pockets adds 3 to 5 small storage slots without touching the cabinet interior at all.
- Using the hook as a bag holder for a small trash bag or grocery bag keeps a secondary waste option accessible below the sink without occupying floor space.
Over-the-cabinet hooks require zero hardware and leave no residue when removed. They clip onto door panels 0.5 to 1.25 inches thick, which covers most standard kitchen cabinet door profiles [site: KCMA Cabinet Standards, 2026].
How Does a Garbage Disposal Impact No-Drill Under-Sink Storage?
A garbage disposal impacts no-drill under-sink storage by occupying the center-floor zone of the cabinet with a fixed motorized unit, blocking the natural placement of wide organizers and flat-based bins. The disposal unit and its connected drain lines reduce usable floor space by 40 to 60% in most standard 24-inch kitchen base cabinets [site: NKBA, 2026].
The P-trap, drain collar, and electrical connection from the disposal create a three-dimensional obstacle that prevents straight-line shelf placement. The result: renters leave both lateral zones beside the disposal completely empty. These zones are fully recoverable with the right products.
4 strategies to organize around a garbage disposal are listed below.
- Install two narrow pull-out caddies (6 to 8 inches wide) on either side of the disposal unit to recover both lateral zones simultaneously.
- Use a U-shaped expandable shelf that bridges over the disposal and creates a second tier above it for lighter items like sponges and gloves.
- Place a slim stackable bin set against the back wall in whichever lateral zone has more clearance after accounting for drain lines.
- Mount tension rods above the disposal at the upper clearance zone to hang spray bottles where the disposal unit cannot block them.
Example: The Simple Houseware under-sink organizer includes adjustable panels specifically designed to straddle garbage disposal units in 24-inch and 30-inch base cabinets.
How Do Expandable Shelves Accommodate Pipes in Under-Sink Storage?
Expandable shelves accommodate pipes in under-sink storage by adjusting their width and internal panel positions to leave clearance for the P-trap, supply lines, and drain collar without cutting or permanent modification. 5 steps to configure expandable shelves around pipes are given below.
- Measure the cabinet interior width, depth, and pipe positions before purchasing. Record the height of the P-trap from the cabinet floor, which ranges from 6 to 12 inches in most residential kitchens.
- Select an expandable shelf rated for your cabinet width, from 18 to 48 inches. Products like the design expandable shelf or Yucaipa Shelf Steps adjust in 1-inch increments.
- Remove or reposition the modular center panel if the shelf includes one. Most adjustable under-sink shelves include removable dividers to create a pipe-clearance gap.
- Set the shelf height so the bottom tier clears the P-trap by at least 1 inch on all sides. This gap allows for pipe movement and prevents rattling during water flow.
- Place the shelf in the cabinet and confirm it sits level before loading any items. An uneven shelf in a moisture-prone zone shifts over time and can topple stored products.
| Shelf Type | Width Range | Pipe Clearance Design | Best For |
| Expandable wire shelf | 18–48 in | Open frame allows pipe pass-through | Wide cabinets with centered pipes |
| U-shaped organizer | 18–30 in | Pre-cut U-channel for disposal | Disposal units |
| Two-tier acrylic shelf | 12–20 in | Flat base, sits beside pipes | Lateral zones only |
| Sliding pull-out caddy | 6–10 in | Narrow profile, no pipe contact | Side zones next to disposal |
What Factors Challenge No-Drill Under-Sink Kitchen Storage?
Under-sink cabinet spaces in rental kitchens present three structural limitations: irregular pipe configurations, high ambient moisture from plumbing proximity, and weight-bearing restrictions imposed by non-permanent mounting systems.
Cabinet interiors in rental units are not designed for heavy storage loads without fixed shelving. The average no-drill adhesive strip holds 1 to 7.5 lbs per strip [site: 3M Command Product Specifications, 2026]. Freestanding organizers depend entirely on the cabinet floor, which is typically particleboard and susceptible to warping if exposed to moisture.
Lease agreements in most U.S. states allow landlords to deduct the cost of cabinet floor replacement from a security deposit if water damage is documented [site: National Apartment Association, 2026]. This makes moisture management as important as the organizational system itself.
The physical constraints of this space — pipes, disposals, supply valves, and limited vertical clearance — mean no single organizer works in every configuration. The right product selection depends on three variables: cabinet width, pipe layout, and the presence or absence of a garbage disposal.
Why Are Heavy Cleaning Supplies Difficult for No-Drill Under-Sink Storage?
Heavy cleaning supplies are difficult for no-drill under-sink storage because adhesive and tension-based mounting systems have fixed weight limits that bulk liquids exceed quickly. A 1-gallon jug of liquid detergent weighs 8.5 lbs (3.9 kg). A 3M Command strip (large format) holds a maximum of 7.5 lbs [site: 3M, 2026]. A single heavy container already exceeds what most no-drill wall-mounted solutions support safely.
Freestanding floor caddies handle heavy liquids better because their load transfers directly to the cabinet floor, not to adhesive or tension. The risk shifts from mounting failure to cabinet floor warping if moisture is also present.
Overloading adhesive hooks causes progressive failure, not sudden collapse. The adhesive stretches slowly over 24 to 72 hours before the hook releases, often dropping the item onto the pipe system or cabinet floor without warning.
Should You Use Heavy-Duty Adhesive Strips for Heavy Liquids?
No. Heavy-duty adhesive strips are not designed to hold bulk liquid cleaning supplies in a moisture-prone environment. Use freestanding caddies for heavy items instead. 4 tips for applying heavy-duty adhesive strips correctly are listed below, for items within their rated weight range.
- Clean the surface with rubbing alcohol and let it dry fully for 60 seconds before applying the strip. Oil, grease, and cabinet-finish residue reduce adhesion by 40 to 60% [site: 3M Application Guide, 2026].
- Press the strip firmly for 30 seconds with even pressure across the entire strip surface, not just the edges.
- Wait the full cure time of 1 hour before hanging any item. Loading the strip immediately after application skips the chemical bonding phase.
- Never exceed 80% of the rated maximum load. A strip rated for 7.5 lbs holds items up to 6 lbs safely to account for dynamic load (door opening and closing vibration).
Why Is Leak Protection Critical for Renter-Friendly Under-Sink Storage?
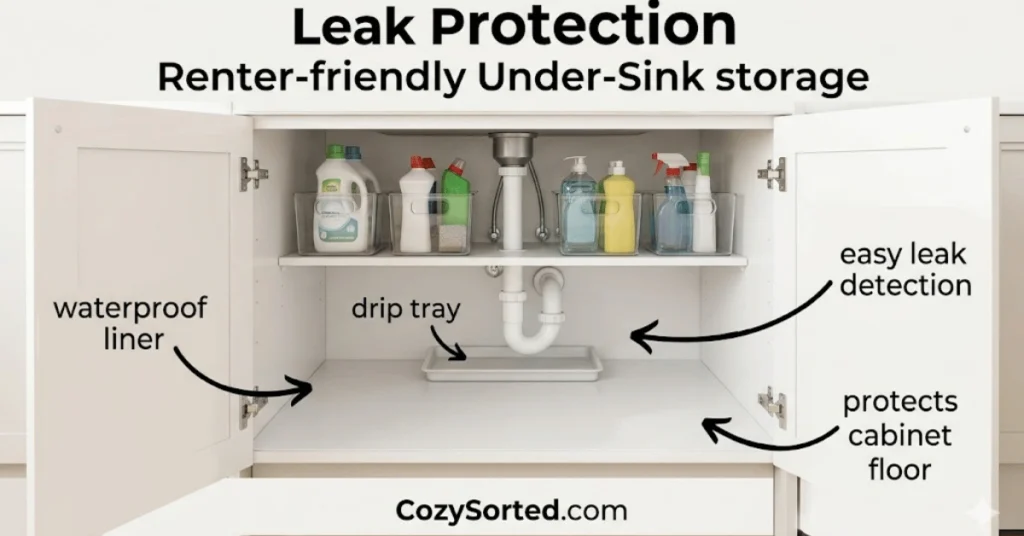
Leak protection is critical for renter-friendly under-sink storage because water damage from undetected pipe drips is one of the top causes of security deposit deductions in U.S. rental units [site: National Apartment Association, 2026]. A slow drip from a P-trap connection or supply valve can soak a particleboard cabinet floor within 48 to 72 hours, causing irreversible warping. The tenant is liable for damage caused by unreported leaks in most lease agreements. An under-sink storage system that covers the pipe connections with bins or organizers also delays the detection of these drips.
The solution is a two-layer defense: a waterproof barrier on the cabinet floor and a drip tray beneath any organizer that sits directly below a pipe connection point.
Should You Use Non-Adhesive Shelf Liners for Leak Protection?
Yes. Non-adhesive shelf liners provide a waterproof barrier between the cabinet floor and any moisture from leaks or condensation, with no damage to the cabinet surface. 4 benefits of using non-adhesive shelf liners are given below.
- Waterproof barrier against pipe drip damage: A silicone or vinyl liner absorbs and contains moisture before it contacts the particleboard cabinet floor, preventing warping and mold.
- Residue-free removal at move-out: Non-adhesive liners sit in place by friction and lift out cleanly, which protects the security deposit from cleaning deductions.
- Easy cleaning between deep cleans: Silicone drip trays and vinyl liners wipe down in under 60 seconds with a damp cloth, removing soap residue, grease, and water spots.
- Leak detection indicator: A liner that shows pooled water alerts you to a pipe issue before it spreads, giving you time to report it to the landlord before damage becomes your liability.
Example: Duck Brand non-adhesive shelf liner (available at Target and Walmart for $6 to $12 per roll) cuts to any cabinet dimension and sits flat without curling.
Why Is Childproofing a Concern for No-Drill Under-Sink Storage?
Childproofing is a concern for no-drill under-sink storage because under-sink cabinets store some of the most toxic household chemicals at the exact height a toddler reaches first. Children aged 1 to 3 account for 44% of household cleaning product poisoning cases reported annually to U.S. Poison Control Centers [site: American Association of Poison Control Centers, 2026]. Standard cabinet doors without locks open with a single pull. A toddler or pet can access dish soap, drain cleaner, or bleach-based sprays within seconds.
No-drill storage systems add to this risk if they make products easier to reach by placing them at cabinet-floor level in open bins. 4 risks associated with unsecured under-sink cabinets are listed below.
- Direct access to corrosive drain cleaners like sodium hydroxide-based products, which cause chemical burns within 30 seconds of skin contact.
- Ingestion of brightly colored dish soaps and pods, which children mistake for food or candy based on color and packaging shape.
- Pet poisoning from floor-level open bins containing pine-based or phenol-based cleaners, which are toxic to cats and dogs at low doses.
- Accidental spray inhalation from trigger bottles stored at floor level that a child can operate with two fingers.
Should You Install Damage-Free Magnetic Locks for Childproofing?
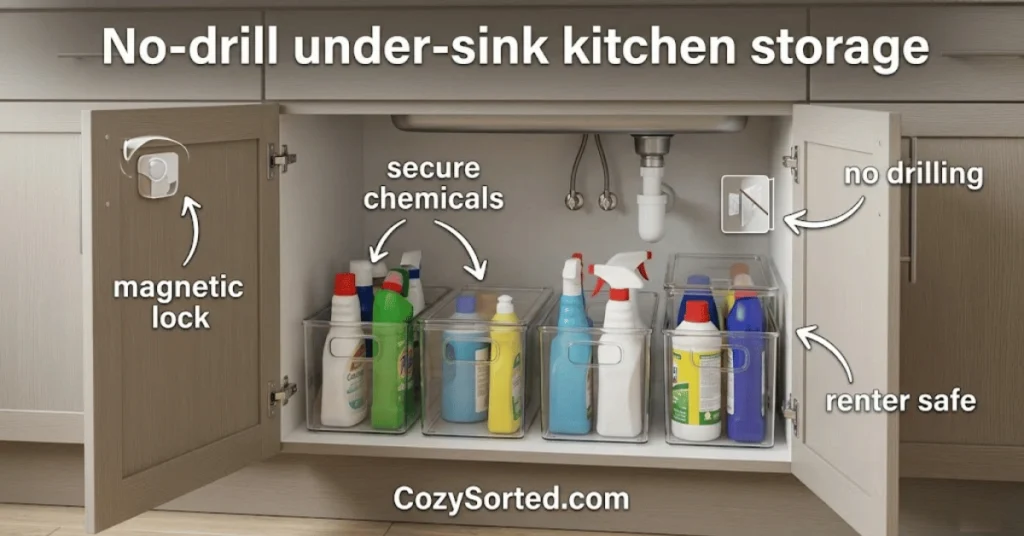
Yes. Damage-free magnetic locks secure under-sink cabinet doors without screws or drilling and remove cleanly without damaging the cabinet finish. 4 steps to install damage-free magnetic locks are outlined below.
- Clean the interior cabinet surface where the lock receiver will mount using rubbing alcohol. Allow 60 seconds to dry before applying adhesive.
- Press the adhesive lock body onto the interior cabinet frame, centered at the top of the door opening. Hold for 30 seconds with firm even pressure.
- Attach the adhesive strike plate to the door panel at the matching contact point. Close the door slowly to confirm alignment before the adhesive fully cures.
- Wait 1 hour before testing the lock with the magnetic key. Testing before full cure time risks displacement of the lock body and failed adhesion.
| Lock Type | Installation Method | Weight on Cabinet | Removal Damage |
| Damage-free magnetic lock | Adhesive strips | 0.3–0.5 lbs | None if removed correctly |
| Screw-mount magnetic lock | Drill required | 0.5–1 lb | Screw holes in frame |
| Sliding bolt latch | Screws required | 0.2–0.4 lb | Screw holes in door |
| Cabinet door knob lock | Friction clip | 0.1 lb | None |
The Safety 1st and Jool Baby brands offer adhesive magnetic cabinet lock kits for $15 to $25 at major U.S. retailers, with no tools required for installation or removal.
Recommended Video: Search YouTube for “damage-free cabinet lock installation rental apartment no drill 2026” to watch a step-by-step visual guide on mounting and removal.
What Are the Common Mistakes to Avoid With No-Drill Under-Sink Storage?
The common mistakes to avoid with no-drill under-sink storage are organizational choices that block plumbing access, overload temporary mounting systems, or create safety and liability risks. 8 common mistakes to avoid with no-drill under-sink storage are listed below.
- Blocking the garbage disposal reset button with a bin or organizer placed directly against the disposal unit. The reset button sits on the bottom of the unit and must stay accessible for manual resets.
- Overloading adhesive hooks beyond their rated capacity, which causes silent progressive adhesive failure over 24 to 72 hours before the item drops.
- Ignoring plumbing access by filling every zone with permanent organizers, which prevents fast pipe inspection when a drip or leak occurs.
- Using permanent hardware like shelf brackets or screws in a no-drill cabinet, which causes deductions from the security deposit at move-out.
- Storing heavy bulk liquids on tension rod systems rated for spray bottles, exceeding the 10 to 15 lb spring-compression limit.
- Skipping a waterproof liner on the cabinet floor, leaving particleboard exposed to drip damage that accumulates invisibly over months.
- Mixing toxic cleaning chemicals in the same bin as food-adjacent products like dish soap refills, which creates cross-contamination risk if a bottle leaks.
- Choosing organizers without measuring the pipe layout first, resulting in products that do not fit around the P-trap and must be returned or discarded.
No-drill under-sink kitchen storage works at full capacity if the system accounts for pipes, weight limits, moisture risk, and child safety from the first product selection. Treat the cabinet as a constrained zone that rewards planning, not a space you fill and fix later.

Mike Mann writes practical home organization and small-space living guides for CozySorted. His work focuses on apartment-friendly storage, clutter-free routines, bedroom organization, and simple systems that help renters, apartment dwellers, and small-space homeowners create calmer, easier-to-maintain homes.