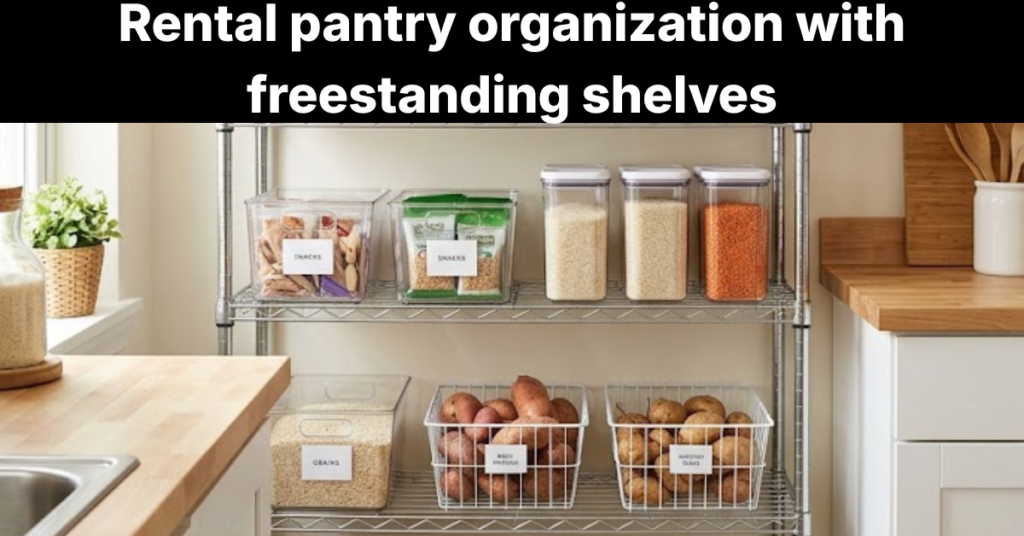
Learning how to organize kitchen drawers properly saves the average home cook 11 minutes per day that is 67 hours a year recovered from searching for tools that should have been findable in seconds.. This guide solves that. It covers the complete system: audit, zone assignment, utensil drawer setup, gadget drawer management, junk drawer transformation, and long-term maintenance. Home cooks, small kitchen owners, and anyone buried in cluttered utensil or junk drawers will find a working system here — not inspiration boards.
The method follows a structured sequence: audit first, then assign zones, then organize drawer by drawer. The outcome is measurable. Every item gets a fixed home. Drawers open fast. Family members can find things without asking. Cooking becomes faster because friction disappears.
Why Does Kitchen Drawer Organization Fall Apart So Quickly?
Kitchen drawers fail because items are assigned randomly without a system, gadgets accumulate without periodic audits, and nothing has a designated home. This is a system design failure, not a space problem. The drawer itself is not the issue — the absence of rules governing what enters it is.
Most households treat the kitchen drawer as a landing zone. Something enters because it has nowhere else to go. Over 18–24 months, that behavior compounds. Drawers fill with duplicate tools, broken gadgets, and items that belong in other rooms entirely [site: NAPO, 2023]. No amount of rearranging fixes a system built on random placement.
The correct entry point is an audit. Before buying any organizer, before measuring any drawer — remove everything first. Categorize what you find. Only then does a zone-based system become buildable.
What Should You Remove from Kitchen Drawers Before You Organize?
Before organizing kitchen drawers, you should remove every item that is broken, expired, duplicated, or belongs in a different room. This pre-organization purge is what makes the system accurate rather than just tidier.
Items to remove from kitchen drawers before organizing are listed below.
- Expired batteries — corroded or dead cells contaminate other items and occupy space that active batteries need.
- Broken or bent utensils — a bent spatula or cracked spoon handle does not perform reliably and creates clutter with no functional return.
- Duplicate tools — three vegetable peelers mean two are stored without purpose; keep the best one and remove the rest.
- Items that belong in other rooms — tape measures, screwdrivers, and phone chargers that drifted into kitchen drawers belong in utility or office zones.
- Gadgets unused in 6+ months — if it has not been touched since last spring, it does not earn prime kitchen drawer space.
- Loose trash items — twist ties, single rubber bands, and empty packaging consume compartment space without contributing any function.
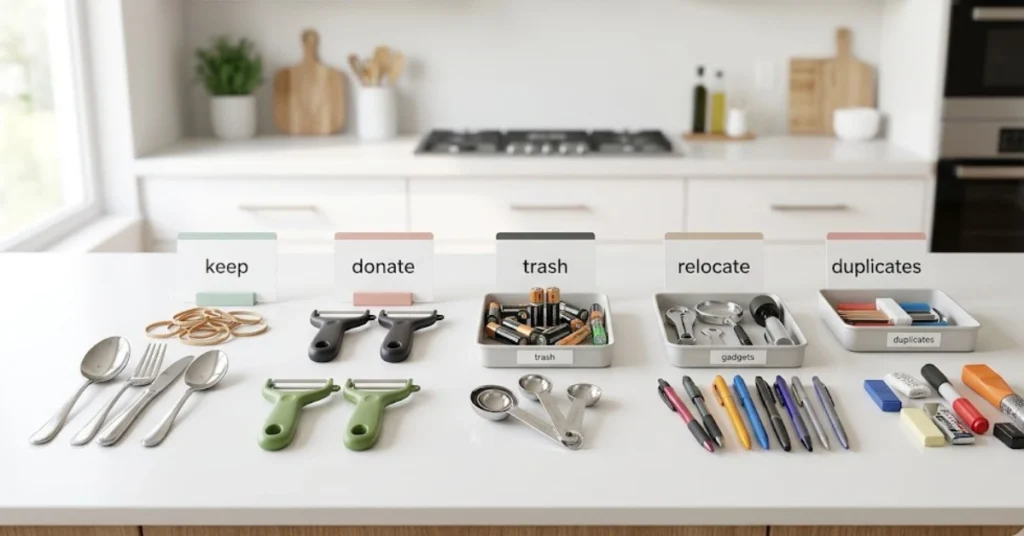
How Do You Decide Which Kitchen Gadgets Actually Earn Drawer Space?
Deciding which kitchen gadgets earn drawer space comes down to a use-frequency test applied consistently across every tool. Frequency, not sentiment, determines placement. Used weekly means prime drawer access. Used monthly means back of drawer. Used rarely means cabinet storage or donation.
Questions to evaluate whether a kitchen gadget earns drawer space are listed below.
- Was this tool used in the last 30 days? If no, it does not belong in a primary drawer zone.
- Does this gadget perform a task no other tool already handles? Redundancy is the single fastest way a drawer fills up.
- Is this tool in working condition right now? A gadget awaiting repair is not a kitchen tool — it is a broken object taking space.
- Would replacing this tool cost less than $15? If yes and it is used rarely, donating and replacing on demand is more efficient than storing it permanently.
- Would a guest be confused to find this in a kitchen drawer? If it does not belong in a kitchen context, it does not belong in a kitchen drawer.
How to Organize Kitchen Drawers Using a Zone-Based System?
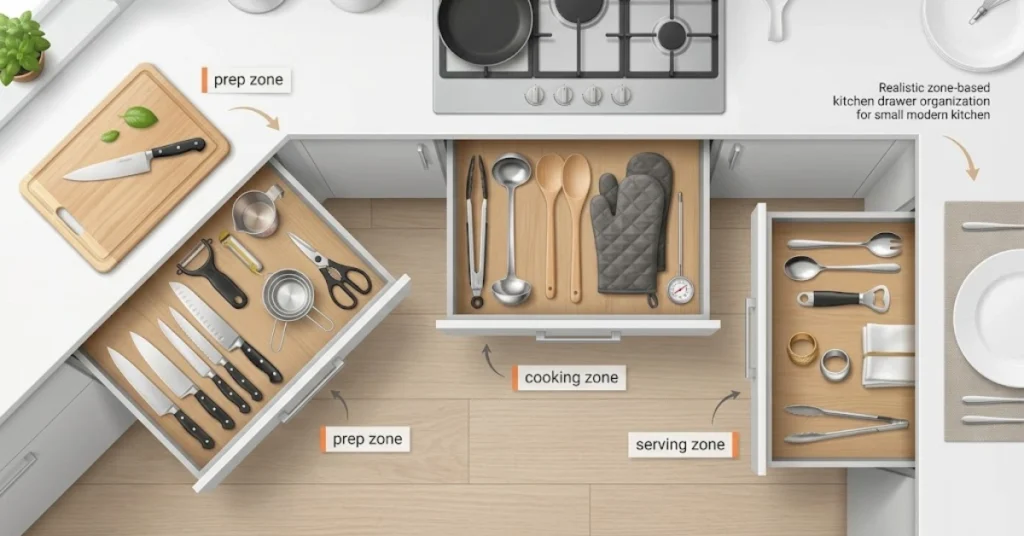
Building a zone-based kitchen drawer system means assigning each drawer a specific purpose tied to a physical workflow location in the kitchen. Each zone maps to where a task happens — prep area, stove, serving surface — so the right tool is always within arm’s reach at the right moment.
Random distribution forces cooks to cross the kitchen for tools multiple times during a single meal. Zones eliminate that. When the ladle lives next to the stove, it is retrieved in one step. When the peeler lives next to the cutting board, prep accelerates. Zone-based systems reduce decision fatigue during cooking by making the correct placement obvious.
Three zones anchor this system: the prep zone, the cooking zone, and the serving zone. Each maps to a specific drawer position based on kitchen layout.
How Do You Assign Each Drawer a Role Based on Your Cooking Workflow?
Assigning each drawer a role based on cooking workflow involves matching drawer location to the physical stage of meal preparation where tools from that drawer are used. Proximity is the organizing principle.
- Closest to the prep area → prep tools: knives, peelers, measuring cups, cutting tools
- Closest to the stove → cooking tools: tongs, ladles, wooden spoons, oven mitts
- Closest to the dining table or serving surface → serving items: serving spoons, wine openers, napkin rings
- Furthest from the active cooking zone → rarely used tools or utility items: specialty gadgets, backup batteries, instruction manuals
The drawer that is physically hardest to reach during cooking should hold the items used least often. The drawer opened 20 times a day should hold the 5–7 tools that drive 80% of cooking activity [site: kitchen workflow research, Cornell Food and Brand Lab].
What Goes in the Prep Zone, Cooking Zone, and Serving Zone Drawer?
The prep zone, cooking zone, and serving zone drawers should contain items that are used exclusively within that workflow stage — cross-zone items create retrieval confusion and slow down cooking.
Contents of each kitchen drawer zone are outlined below.
Prep Zone
- Cutting tools: chef’s knife, paring knife, kitchen shears — tools used before heat is applied
- Peelers, graters, and zesters — surface prep tools used at the cutting board
- Measuring cups and and measuring spoons — portioning tools used before ingredients enter the pot
- Flexible spatulas and bench scrapers — tools used at the prep surface, not the stove
- Kitchen timers — used from the prep stage onward and accessed frequently
Cooking Zone
- Tongs and ladles — high-use tools accessed during active cooking at 300–450°F+ temperatures
- Wooden spoons and silicone stirring spoons — stove-adjacent tools that protect non-stick cookware
- Oven mitts and trivets — heat protection tools used exclusively at or near the stove
- Meat thermometers — used at the stove or oven, not at the prep counter
Serving Zone
- Serving spoons and slotted servers — used at the table or plating station, not during cooking
- Wine and bottle openers — accessed at the serving moment, not the prep moment
- Napkin rings, table accessories, and serving tongs — belong in the zone closest to the dining surface
How Do You Organize Multiple Drawers When You Only Have 2 or 3?
Organizing multiple purposes into only 2 or 3 kitchen drawers requires collapsing zones without losing function — using dividers to create internal boundaries where separate drawers are not available.
The most effective approach: combine the prep zone and cooking zone into one drawer using a dual-section expandable divider. Dedicate the second drawer exclusively to flatware and cutlery. If a third drawer exists, assign it as the utility and junk zone. A multi-function drawer insert with 4–6 compartments is the critical tool that makes this work without creating visual chaos.
Tips for organizing a small kitchen with only 2–3 drawers are listed below.
- Use an expandable bamboo tray with adjustable sections to create internal zones inside a single drawer
- Place flatware in the most-accessed drawer since it is retrieved at every meal
- Mount a wall-mounted magnetic knife strip to free an entire drawer from knife storage duty
- Use a rolling utility cart for overflow gadgets — it adds 2–3 functional “drawers” without permanent installation
- Assign the deepest drawer to bulky or rarely used items; shallow drawers go to daily-use tools
How to Organize a Kitchen Utensil Drawer?
Organizing kitchen utensils in a drawer starts with measuring the drawer interior before purchasing any organizer. Drawer dimensions, utensil count, and frequency of use determine which organizer type works — not the other way around. Buying first and measuring second is the most common and most expensive mistake in drawer organization.
Four strategies determine the outcome: measuring correctly, choosing the right organizer type, solving the long-utensil problem, and setting up in-drawer knife storage safely. Each is sequenced. The measurement step cannot be skipped without creating a mismatch between the organizer and the actual drawer cavity.
How Do You Measure a Kitchen Drawer Before Buying an Organizer?
Measuring a kitchen drawer before buying an organizer requires capturing interior dimensions, not exterior cabinet dimensions — the two differ by 1–3 inches depending on drawer slide type and frame construction.
Measurements to take before purchasing a kitchen drawer organizer are listed below.
- Interior width — measure wall-to-wall inside the drawer box, not the cabinet face; this is the functional width available for the organizer tray.
- Interior depth (front to back) — measure from the front interior wall to the back wall; subtract 0.5 inches for drawer front clearance.
- Clearance height — measure the distance between the drawer bottom and the bottom of the cabinet above when the drawer is closed; this determines maximum organizer height.
- Slide clearance on each side — subtract 0.5–1 inch per side to account for drawer slide hardware that occupies interior width.
- Note any obstructions — pipes, corner brackets, or drawer lock mechanisms that reduce usable interior space must be identified before any purchase.
What Are the Best Drawer Dividers and Organizer Types for Utensil Drawers?
The best drawer dividers and organizer types for kitchen utensil drawers are determined by drawer depth, utensil count, and budget — no single organizer works universally across all drawer configurations.
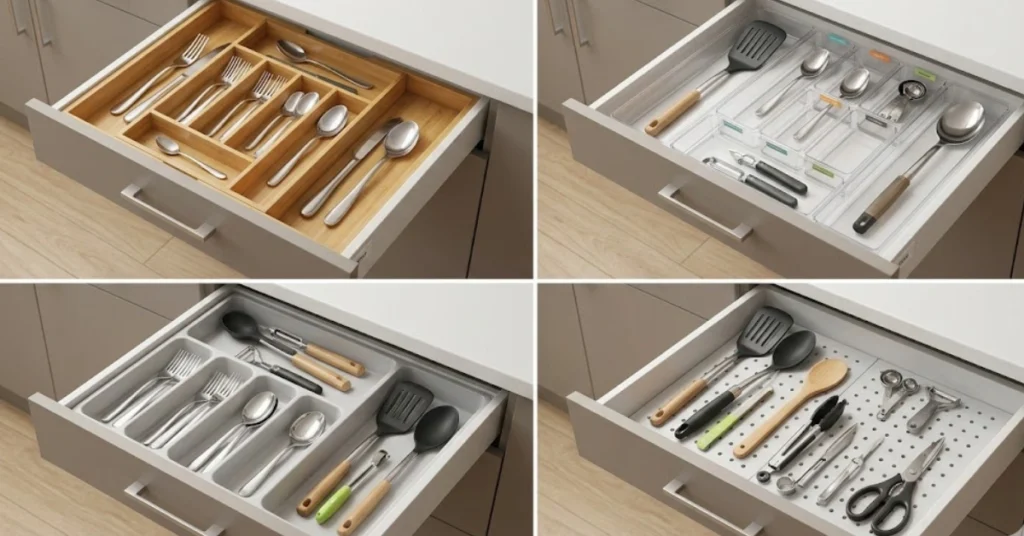
Best drawer organizer types for kitchen utensil drawers are listed below.
- Expandable bamboo cutlery tray — the most versatile option; adjusts from 13–22 inches wide, fits most standard drawers, costs $20–$35; ideal for drawers 3–5 inches deep.
- Individual modular tray set — fully customizable; separate trays slot together in any configuration; costs $30–$60 depending on piece count; best for irregular drawer shapes.
- Tension-rod dividers — a no-purchase DIY solution using adjustable spring-tension rods placed across the drawer width; works in any drawer but lacks compartment depth control.
- Expandable plastic insert — budget option at $8–$15; expandable from 11–19 inches; suits renters or temporary setups; less durable than bamboo over 3+ years.
- Pegboard-style adjustable insert — best for deep drawers over 3.5 inches; pegs reposition to create custom compartment sizes; costs $40–$80; used by professional kitchen organizers.
How Do You Store Long Utensils, Serving Spoons, and Oversized Tools in a Drawer?
Storing long utensils, serving spoons, and oversized tools in a drawer requires solving the length problem — standard organizer compartments measure 9–12 inches, which is too short for 14–16 inch tools like pasta forks, slotted spoons, and silicone turners.
Three solutions work reliably. A diagonal sorter insert positions long tools at a 30–45 degree angle, fitting 16-inch tools in a 12-inch compartment. A full-length undivided tray section running front-to-back accommodates oversized tools without forcing them to angle. A dedicated deep section at the back of the drawer — separated from the main organizer — holds long tools vertically when drawer depth allows it (4+ inches).
- Diagonal inserts save up to 35% more space than straight-lay configurations for tools over 13 inches
- Full-length tray sections work best when no more than 4–6 oversized tools need storage
- Avoid stacking long utensils without dividers — stacking leads to tangling and retrieval slowdown
What Is the Best In-Drawer Knife Block Setup for Safe and Space-Efficient Storage?
The best in-drawer knife block setup for safe and space-efficient storage involves a universal foam-insert in-drawer knife block that holds blades edge-down in individual slots, prevents blade contact, and locks knives in place without countertop footprint.
In-drawer knife blocks outperform countertop blocks in small kitchens. They protect blade edges from ambient contact, free 6–10 inches of countertop space, and position knives below the counter surface making them inaccessible to children under 48 inches tall without deliberate drawer opening [site: American Academy of Pediatrics, kitchen safety guidelines].
- Choose a block with individual foam-lined slots for each knife — universal slots that use friction to hold blades protect edges better than open-slot designs
- Look for a combined sharpening steel slot within the same insert to consolidate all blade tools in one location
- Measure knife blade length before purchasing: most in-drawer blocks accommodate blades up to 8 inches; Japanese-style knives up to 10 inches require extended blocks
How to Organize Kitchen Gadgets in a Drawer?
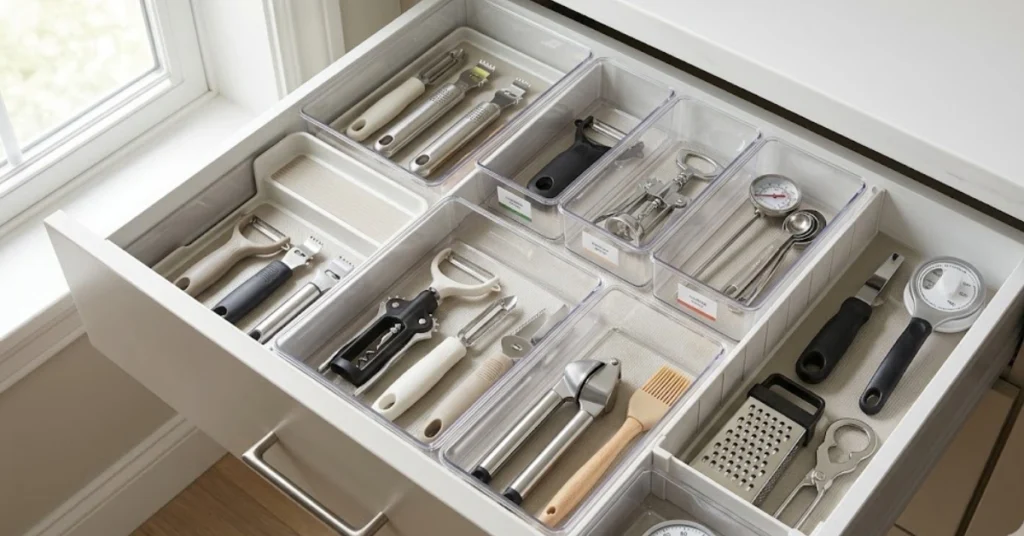
Organizing kitchen gadgets in a small or deep drawer requires treating gadgets as a distinct category from utensils because gadgets — peelers, graters, zesters, corkscrews, thermometers, mandolines — are irregular shapes that resist standard organizer grid layouts designed for flat or cylindrical utensils.
The core challenge is shape variance. A ladle is cylindrical. A box grater is rectangular and tall. A corkscrew is L-shaped. A silicone pastry brush is flat. No single compartment size fits all three efficiently. Gadget drawer organization requires a function-cluster approach paired with organizer solutions designed specifically for shape variance.
Three strategies deliver results: function-based separation, deep drawer solutions, and liner selection that prevents organizer migration.
How Do You Separate and Store Gadgets by Function in a Single Drawer?
Separating and storing kitchen gadgets by function in a single drawer involves clustering tools by what they do, not by what they look like or how often they are used. Function grouping creates retrieval logic — when you need a gadget, you go to the cluster for that task, not to a specific position.
Function-based gadget groupings for a kitchen drawer are listed below.
- Cutting and peeling tools — vegetable peeler, julienne peeler, apple corer, mandoline blade, zester; these share sharpness risk and benefit from a covered section or blade-safe compartment.
- Measuring tools — measuring spoons, instant-read thermometer, kitchen scale (if compact), candy thermometer; grouped by the precision-task function they share.
- Opening tools — corkscrew, bottle opener, can opener (if compact), jar opener grip; all accessed at the same moment — when a container needs to be opened.
- Timing and monitoring tools — kitchen timer, oven thermometer, probe thermometer; grouped by their monitoring function during cooking.
- Mixing and pressing tools — garlic press, pastry blender, potato masher, citrus reamer; tools that apply force or compression during prep.
What Are the Best Organizer Solutions for Deep Kitchen Drawers?
The best organizer solutions for deep kitchen drawers are two-level tiered inserts and stackable clear bins — both exploit vertical space that standard flat trays leave entirely unused in drawers over 4 inches deep.
Best organizer solutions for deep kitchen drawers are listed below.
- Two-level tiered insert — top layer slides horizontally to reveal a second storage layer below; doubles capacity in drawers 4.5+ inches deep; costs $35–$65; best for gadget drawers with 15+ items.
- Stackable clear bins — individual clear containers stack vertically and label easily; allows full visual inventory without removing items; costs $15–$30 for a set of 6.
- Divider rods with adjustable height — vertical rods that create tall compartments for upright gadget storage; best for items like silicone brushes, whisks, and bottle openers that stand better than they lay flat.
- Drawer-within-a-drawer pull-out tray — a secondary tray on ball-bearing slides that pulls out independently within the main drawer; accessed like a separate drawer inside a drawer; costs $40–$90.
- Custom foam insert — precision-cut foam specific to gadget shapes; used in professional kitchens and photography equipment drawers; costs $25–$80 depending on size and foam density.
Which Drawer Liner Works Best Under Kitchen Utensil and Gadget Organizers?
The drawer liner that works best under kitchen utensil and gadget organizers is a non-slip ribbed liner — it prevents organizer trays from shifting during use without adhesive, leaves no residue on removal, and is machine washable.
Best drawer liner types for kitchen utensil and gadget drawers are listed below.
- Non-slip ribbed liner — prevents organizer migration during opening and closing; cuts to size with scissors; costs $8–$15 per roll; best for most standard drawers.
- Cushioned felt liner — reduces clattering noise from metal utensils and gadgets; adds a quiet, premium feel to the drawer; costs $10–$20 per roll; best for flatware drawers.
- Wipe-clean vinyl liner — easiest to maintain; spills and grease wipe off with a damp cloth; no washing required; costs $6–$12 per roll; best for cooking and gadget zones near the stove.
- Adhesive liner — bonds permanently to drawer bottom; eliminates all movement including the liner itself; costs $8–$18; best for older drawers with warped or uneven bottoms.
- Natural cork liner — eco-friendly; provides light cushioning and mild grip; costs $12–$22 per roll; does not hold up well to moisture or oil exposure without sealing.
How to Organize a Kitchen Junk Drawer?
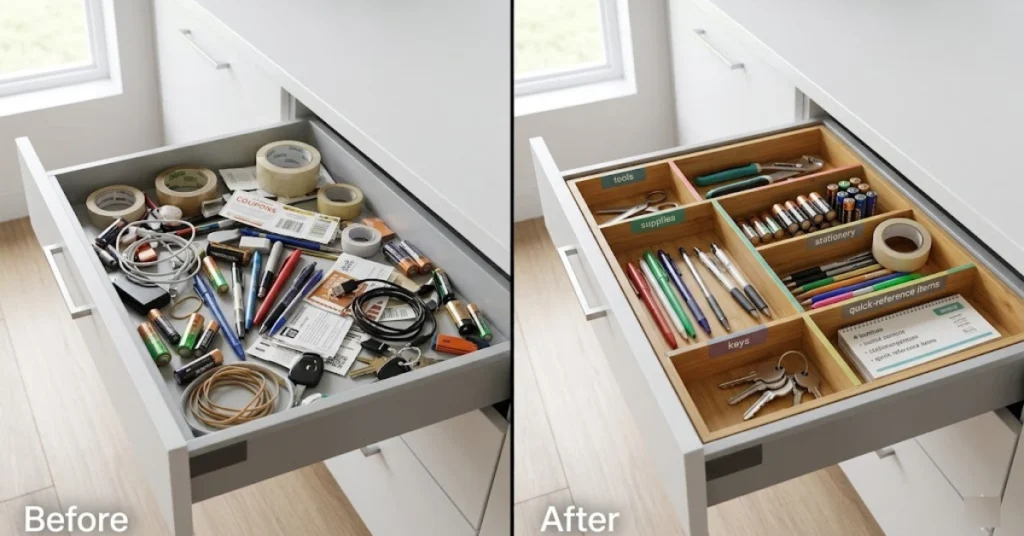
Transforming a junk drawer into a functional kitchen utility zone means redefining it as an unassigned utility drawer that needs category mapping — not eliminating it. The junk drawer is not a failed space. It is a legitimate household need that has never been given structure.
Every household needs a command center drawer: a single location for household tools, stationery, batteries, spare keys, and quick-access items used infrequently but urgently. The problem is not the drawer’s existence — it is that nothing inside it has a designated slot, so everything piles together without hierarchy or retrieval logic.
Three strategies convert the junk drawer permanently: category system design, tray-based organization, and committed removal of items that should never return.
What Categories Should a Functional Junk Drawer Contain?
A functional junk drawer should be organized into 5–6 defined categories maximum — more categories than a tray can physically section creates overlap, and overlap recreates junk.
Categories to include in a well-organized kitchen utility drawer are listed below.
- Tools — scissors, clear tape, a small flathead and Phillips screwdriver; the minimum toolkit for household quick-fixes without opening a full toolbox.
- Supplies — AA and AAA batteries, spare LED bulbs, adhesive hooks; consumable items accessed less than monthly but needed immediately when depleted.
- Stationery — 2–3 working pens, a small notepad, a book of stamps; used for quick notes, labels, and mail tasks at the kitchen counter.
- Keys and accessories — spare house keys, a small USB charger, binder clips, a spare set of car keys; items accessed occasionally but critically when needed.
- Quick-reference materials — 3–5 current takeout menus, a school or family activity calendar, 2–4 active coupons with unexpired dates only.
How Do You Set Up a Junk Drawer Organizer Tray System?
Setting up a junk drawer organizer tray system involves matching tray section count to category count before any organizer is purchased — the tray must accommodate the system, not the system adapt to the tray.
Steps to set up a kitchen junk drawer organizer tray system are given below.
- Empty the junk drawer completely — place every item on the counter so the full contents are visible and nothing is assumed to have a purpose.
- Decide on 4–6 categories — name each category before touching the organizer; categories define sections, not the other way around.
- Measure the drawer interior — record interior width, depth, and clearance height using the same measurement method as utensil drawers.
- Choose an expandable tray with matching section count — a tray with 5 sections for 5 categories; expandable bamboo trays adjust from 13–22 inches and cover most standard drawers.
- Assign one section per category — place the tray, then allocate each compartment to one category before placing any items inside.
- Label each section — use a label maker tape strip on the tray divider or a small card in a clear adhesive sleeve; labels enforce the system for every household member.
- Discard everything that does not fit a category — if an item cannot be assigned to one of the 5–6 defined sections, it does not belong in this drawer.
What Items Should Leave the Junk Drawer Permanently?
Items that should leave the junk drawer permanently include anything that is expired, broken, unidentifiable, or belongs to a different room’s functional system. Permanent removal is what separates a one-time cleanout from a lasting system.
Items to permanently remove from the kitchen junk drawer are listed below.
- Dead batteries — spent cells cannot be stored safely with active batteries; dispose through a retailer battery recycling program [site: Call2Recycle, EPA battery disposal guidelines].
- Expired coupons — no redemption value exists after expiration; they occupy space that active coupons need.
- Mystery keys with no identified locks — a key without a known lock is not a spare; it is an unresolved object; dispose of it.
- Single-use takeout condiment packets — soy sauce and hot sauce packets accumulate without use and are replaced free with every order.
- Broken items awaiting repair — items stored “to fix later” are rarely repaired; if repair has not happened in 90 days, it will not happen.
- Items that belong in another room — tape measures, playing cards, and phone chargers that drifted into the kitchen drawer belong in their functional zone.
- Instruction manuals — photograph and store digitally using a free app like Google Lens or a dedicated folder in Google Drive; the physical manual occupies space the digital version does not.
Should Your Kitchen Drawer Organization System Change Based on Kitchen Size or Cooking Style?
Whether your kitchen drawer organization system should change based on kitchen size or cooking style depends on two variables that operate simultaneously: available drawer count and cooking frequency. A kitchen with 8 drawers supports full zone separation. A kitchen with 3 drawers requires zone compression. A daily home cook needs high-frequency tools at maximum accessibility. An occasional cook tolerates a less optimized arrangement without real cost.
Both variables must be assessed before selecting a system. A premium organizer installed in a 2-drawer kitchen with a mismatched zone framework produces worse outcomes than a $10 tray in a correctly zoned 3-drawer kitchen.
Should Your Kitchen Drawer Organization System Change Based on Kitchen Size or Cooking Style?
Kitchen layout and drawer count directly shape which organization strategy works best because drawer count is the primary variable that determines whether full zone separation is possible. A kitchen with 6 or more drawers supports independent zones for prep, cooking, serving, flatware, gadgets, and utility. A kitchen with 2–3 drawers requires multi-function drawers with internal dividers doing the work that separate drawers would otherwise handle.
Layout compounds this. A galley kitchen with drawers on one wall forces zone compression regardless of drawer count. An L-shaped kitchen allows zone-to-location matching when drawers appear on multiple walls. The correct system is the one that fits the physical constraints — not the one that looks best on an inspiration board.
What Drawer Organization System Works in a Small Kitchen with Few Drawers?
The drawer organization system that works best in a small kitchen with few drawers is a compressed zone system using internal dividers to create functional separation within each drawer rather than across drawers.
Tips for organizing a small kitchen with only 2–3 drawers are listed below.
- Combine prep and cooking zones into one drawer using a dual-section expandable divider — prep tools occupy the front section, cooking tools occupy the back section.
- Dedicate one drawer exclusively to flatware — flatware is accessed at every meal and benefits from a fixed, unshared location with a standard cutlery tray.
- Use a wall-mounted magnetic knife strip to remove knives from drawer space entirely — a 16-inch strip holds 6–8 knives and frees an entire drawer section.
- Add a rolling kitchen cart for gadget and utility overflow — a cart with 2 drawers adds 100–150% more functional drawer space without permanent installation.
- Use a hanging rail system inside a cabinet door adjacent to the primary prep drawer — hooks and small baskets mounted to the door interior extend gadget storage without consuming drawer space.
What Budget-Friendly vs. Premium Organizer Options Are Worth the Investment?
The budget-friendly vs. premium kitchen drawer organizer options worth considering are tiered by durability, adjustability, and whether the kitchen is permanent or rented — the correct tier is not determined by preference but by use case.
Kitchen drawer organizer options by budget tier are listed below.
- $0–DIY — tension rods placed across the drawer width, repurposed cardboard boxes cut to depth, or small food storage containers repurposed as compartments; no durability, but functionally valid as a proof-of-concept before committing to a purchase.
- $10–$25 budget — plastic expandable tray (11–19 inch range), basic 5-section cutlery insert; adequate for renters or temporary setups; replace every 2–3 years as plastic warps under humidity.
- $25–$50 mid-range — expandable bamboo tray or individual modular tray set; the strongest value tier; bamboo resists warping and moisture better than plastic; modular sets allow reconfiguration if drawer contents change.
- $50+ premium — custom wood inserts with dovetail joints, acrylic modular systems with transparent compartments, or pegboard-style adjustable inserts used in professional kitchen design; worth the investment in permanent kitchens where the layout will not change within 5 years.
How to Keep Kitchen Drawers Organized Long-Term?
Keeping kitchen drawers organized long-term requires a monthly reset routine and a household labeling system — no organization system maintains itself through use alone. Items migrate. Household members return tools to wrong drawers. Organizer trays shift. Without a scheduled maintenance touchpoint, entropy restores the original clutter within 4–6 months [site: NAPO long-term organization study, 2022].
Two habits determine whether a system lasts: a monthly physical reset that takes under 10 minutes per drawer, and visible labels that eliminate guesswork for every person who opens the drawer.
What Is a Simple Monthly Drawer Reset Routine for Kitchen Drawers?
A simple monthly drawer reset routine for kitchen drawers involves 6 steps that take under 10 minutes per drawer — the speed matters because a routine that feels effortful gets skipped.
Steps in a monthly kitchen drawer reset routine are listed below.
- Open every drawer fully — do not audit from memory; physically open each drawer and look at all contents at once.
- Remove anything that does not belong — items that migrated from another zone go back to their assigned drawer immediately, not “when you get to it.”
- Check for broken or expired items — one broken item per month is normal; remove it immediately rather than letting it accumulate across months.
- Return displaced items to their correct drawer zones — items found in wrong drawers signal either a labeling gap or a zone assignment that does not match actual behavior.
- Wipe the drawer liner — a 30-second wipe with a damp cloth removes crumbs, grease residue, and debris that accumulate under organizer trays.
- Adjust any organizer tray that has shifted — expandable trays compress under use; reset to the measured position and confirm sections align with their labeled categories.
How Do You Label Kitchen Drawers to Keep Every Family Member on System?
Labeling kitchen drawers to keep every family member on the organization system involves placing a visible identifier at the point of decision — either on the drawer face before it opens or inside the tray divider immediately visible when the drawer opens. Labels eliminate guesswork and prevent misfiling by removing the need for anyone to remember the system.
The most effective label placement is inside the drawer on the tray divider itself — it is visible at the moment the drawer is open and an item needs to be returned, which is the exact moment the decision is made.
Best labeling methods for kitchen drawers are listed below.
- Label maker tape on drawer face — applied to the exterior drawer front below the handle; visible from across the kitchen; best for households with children learning the system.
- Chalkboard label on inside tray divider — repositionable if zones change; written in chalk marker; reads clearly when the drawer is open and an item needs to be returned.
- Printed category cards in clear adhesive sleeve — a printed card inside a 2×1 inch clear sleeve adhered to the tray divider; professional appearance; easy to swap when categories change.
- Color-coded zone labels — assign one color per zone (prep = blue, cooking = red, utility = green); apply color dot stickers to drawer faces and matching tray sections; works for households where reading labels is slower than reading color.
- Handwritten masking tape — the fastest implementation; 1-inch masking tape labeled in permanent marker placed on each tray section; replace every 6–12 months as adhesive weakens.

Mike Mann writes practical home organization and small-space living guides for CozySorted. His work focuses on apartment-friendly storage, clutter-free routines, bedroom organization, and simple systems that help renters, apartment dwellers, and small-space homeowners create calmer, easier-to-maintain homes.